 I'm getting to where I REALLY like the "FYI" set, so I was very glad to see it in the new catalog. I am using it more and more and I really like this card sample. It's a super way to use your designer paper scraps. This happens to be the Kaleidoscope Designer Series Paper. Too bad I discovered it too late - I love all of the brilliant colors in it!
Monday, June 21, 2010
FYI Card Sample!
I'm getting to where I REALLY like the "FYI" set, so I was very glad to see it in the new catalog. I am using it more and more and I really like this card sample. It's a super way to use your designer paper scraps. This happens to be the Kaleidoscope Designer Series Paper. Too bad I discovered it too late - I love all of the brilliant colors in it!


Friday, June 18, 2010
Little Angel and Crazy Cool Card Samples!

 Here's two of my 7:00 a.m. cards, only I made them at 3:00 this afternoon! Sometimes you have to be flexible - and today, I had to be flexible! Aren't they cute? You know me - I love texture, buttons, and ribbon! I think my favorite is the "you totally rock" card! How often do you get a card that says that? NEVER! I get tired of the same old greetings: thank you, happy birthday, thinking of you, and yada, yada, yada. Why not "YOU TOTALLY ROCK"? I like it! I thought you might like to see it!
Wednesday, June 16, 2010
Floral Fusion Embosslits Card Sample!

I've had my Floral Fusion Big Shot Embosslits for a long time now and haven't had the opportunity to use it! When I saw this card on Stampin' Connection, I knew it was time to pull it out and use it. This card makes me happy! You just build the flowers on top of each other and place a half-back pearl in the center and VOILA!, you've got an awesome card! If you don't have the Floral Fusion Embosslits, you REALLY should think about getting it! Call ME, YOUR Stampin' Up! demonstrator, and order it today!
Tuesday, June 15, 2010
Pool Process - Step 11!


 It's getting so close, I can taste it! I'm jumping out of my skin to get our pool finished! Today the pool workers poured the concrete for the decking around the pool. Once they fill in all the spaces, they take a big spatula-looking-thing and smooth it out nice and pretty! Of course, once they were gone, me and Hunter and Haley (and Otto, too!) had to go out there and mess with it! The kids put their handprints and names into it and I just put my thumbprint in it! Of course the kids wanted Otto's paw print in it, too, but he started walking in it and got several paw prints in it! That's okay - it will all be covered up with flagstone on Monday morning! And then we can plaster! I went outside to take pictures of our handprints, but it had rained a little bit and almost completely washed away what we had done. BUMMER!
Monday, June 14, 2010
Pool Process - Step 10!

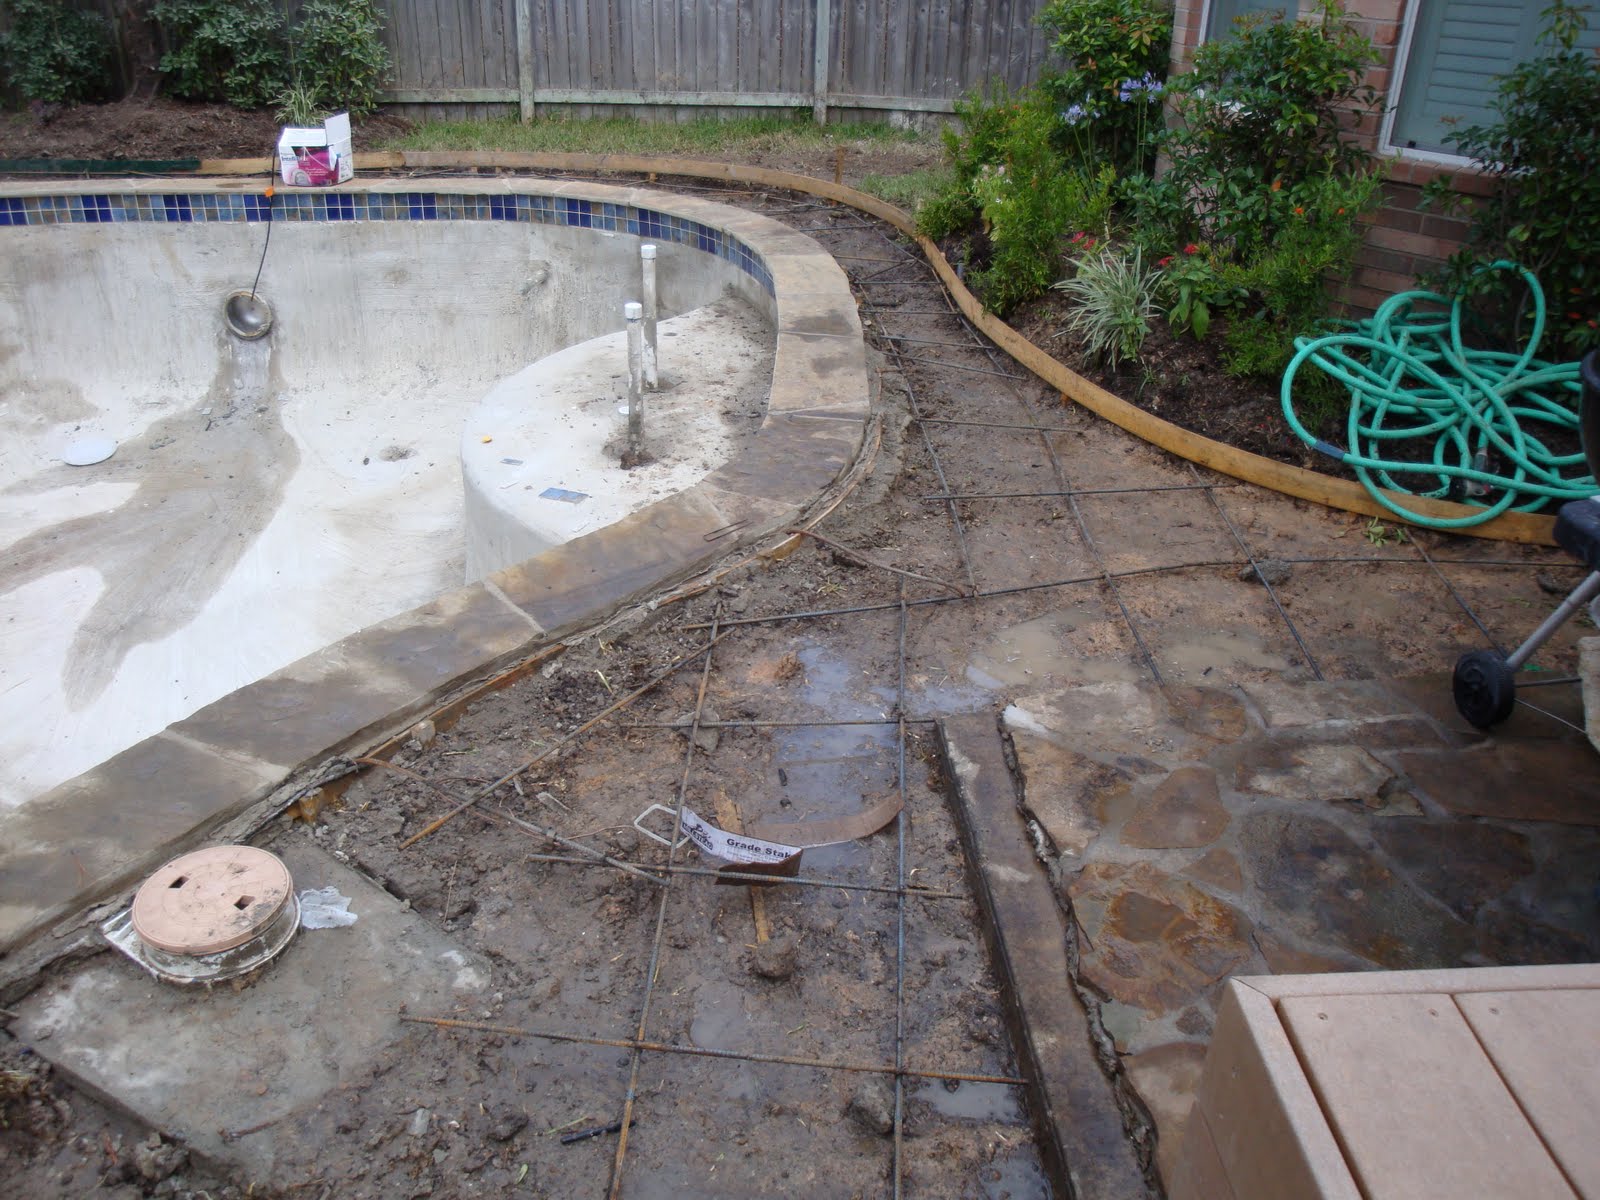 We're getting really close now! Today the pool workers started preparing the decking that will go around the pool! The two pictures above show you what the shape of the decking will be. Tomorrow, the concrete will be poured! The following Monday, the flagstone will be set in place and then we'll plaster and finish the landscaping! It's all amazing when you realize it's only been a week-and-a-half since they started on June 2nd! WOO HOO! I am super-excited about all of this and I can't wait to jump into my pool! I am very happy with all of it!
Bouquet Bunch Card Sample!
 Isn't this a cutie? I wish I had worked with my ribbon a little bit better, but I found that to be quite challenging! I saw this card on Stampin' Connection and wanted to try it - and I love it - but I need to work on getting my ribbon lined up better! It starts out small and then gets bigger on the way down, but I still love it and wanted to share it with you! Have a super day!
Sunday, June 13, 2010
Summer Things with Bling Camp Wannastamp!


 I love this style of card! I've been seeing it a lot on Stampin' Connection and e-mailed one of the gals who has been posting them (sorry, I can't remember who) and asked her how to do it! She was kind enough to give me the instructions. It can be kind of tedious, but I love the clean, sharp look you can get! Outline images work the best for this type of card, so I've also included a sample of a more feminine card I made using "Fifth Avenue Floral" for the image. All supplies used and shown are from Stampin' Up!
Recipe:
Paper: Sahara Sand - 8-1/2 X 5-1/2; Sahara Sand - 5-1/4 X 4
Inks: Basic Black Marker; Versamark
Stamps: Any of these images work nicely for Father's Day, so take your pick: Motorcycle (P. 31 of the Summer Mini Catalog; King of the Grill (P. 29 of the Summer Mini Catalog); Loads of Fun - the camper (P. 59 of the catalog); Totally Tool (P. 66 of the catalog)
Miscellaneous: Stampin' Dimensionals; pencil; ruler; Stamp-a-ma-jig; White Pen Eraser; Black Embossing Powder; Heat Tool; Black Brads or Silver Brads, depending on your image; Paper Piercer with Mat; Embossing Buddy
Summer Things with Bling Camp Wannastamp!

 OH, BOY, THIS COULD BE ADDICTING! Take a pair of cheap flip-flops and turn them into something fun and stylish! We embellished flip-flops at my Summer Things with Bling Camp Wannastamp and they were a big hit! Use your Crop-A-Dile to pierce a 1/8" hole right next to the center of the rubber straps. Run your foam sheet through the Big Shot machine using the Flower Daisies #2 Die. SNAIL the three daisies together just to make them easier to work with and don't remove the little circle in the center of each flower (that piece keeps the brad from sinking down into the hole)! Stamp the "Circle Circus" stamp in Basic Black ink (or whatever color you desire) on white card stock and punch it out with a 1/2" hole punch. Place that piece into a Pewter Build-A-Brad and then stick the brad into the center of the flowers. The Build-A-Brad can easily pierce the foam, but I used a paper piercer. You can also use our designer brads, if you prefer! Then take the flowers and place them into the 1/8" hole you made with the Crop-A-Dile. Bend the little prongs WAY back so that they won't rub your foot when you walk. I used the paper piercer to help me open up the prongs. VOILA - you've got an awesome pair of flip-flops that you'll be proud of!
Recipe:
Paper: Foam Sheets - 5-3/4 X 5-1/4; Whisper White Scrap
Stamps: Circle Circus (P. 129 of the catalog)
Inks: Basic Black (or whatever color coordinates with your flip-flops)
Miscellaneous: Big Shot Machine; Flower Daisies #2, SNAIL Adhesive; Pewter Build-A-Brads (our silver Designer Brads look cute, too); 1/2" Circle Punch; Crop-A-Dile; Paper Piercer with Mat
Summer Things With Bling Camp Wannastamp!
 Here's one of the cards we made at my Summer Things with Bling Camp Wannastamp! Simple, elegant, and just perfect! All supplies used and shown are from Stampin' Up! I probably got this idea from Stampin' Connection, an awesome resource for Stampin' Up! demonstrators!
Recipe:
Paper: Whisper White - 11 X 4-1/4; Whisper White; 5-1/4 X 4; Whisper White - 3-1/8 X 3-1/8; Pretty in Pink - 3-1/4 X 3-1/4; Whisper White Scrap
Inks: Basic Black; Black Stazon; Pretty in Pink Marker
Stamps: Blissful Bride (P. 20 of the Summer Mini Catalog)
Miscellaneous: Elegant Bouquet Embossing Folder; Big Shot Machine; Stampin' Dimensionals; SNAIL Adhesive; Stamp-a-ma-jig; 2-Way Glue Pen; Dazzling Diamonds Glitter; Pretties Kit Half-Back Pearl; Mini Glue Dots; Pretty in Pink Satin Ribbon - 15" long; Scissors; Large Oval Punch; Scallop Oval Punch
Summer Things With Bling Camp Wannastamp!
 Okay, now I'm a BIG fan of the "Sweet Scoops" stamp set! That little cherry has won me over! This is a card we made at my Summer Things With Bling Camp Wannastamp and the Dazzling Diamonds Glitter on the ice cream makes it look frosty-cold! YUMMY! The little cherry has Crystal Effects on it and, to me, is what makes the card so ADORABLE!
Recipe:
Paper: Pretty in Pink - 8-1/2 X 5-1/2; Chocolate Chip - 4-1/2 X 3-1/4; Whisper White - 3-1/2 X 3-1/8; Chocolate Chip Designer Series Paper - 3-1/8 X 1; Whisper White Scrap
Stamps: Sweet Scoops (P. 10 of the Summer Mini Catalog); In a Word (P. 10 of the Summer Mini Catalog)
Inks: Creamy Caramel; Chocolate Chip; Pretty in Pink; Chocolate Chip Marker; Pretty in Pink Marker; Real Red Marker
Miscellaneous: Big Shot Machine; Perfect Polka Dots Embossing Folder; Stampin' Dimensionals; SNAIL Adhesive; Corner Rounder; Pretty in Pink Satin Ribbon - 14" long; Scissors; Stamp-a-ma-jig; Paper Snips; Dazzling Diamonds Glitter; 2-Way Glue Pen; Mini Glue Dots; Crystal Effects
Summer Things with Bling Camp Wannastamp!
 I absolutely LOVE anything Americana, so I'm quite proud of this card! It needs some red, you think? NAHHHHH! You can always take a Bravo Burgundy Marker or Real Red Marker and ink up the "&" between "Stars & Stripes," if you need to, or use Real Red Grosgrain Ribbon in place of the Chocolate Chip! It all looks good! With Gold Encore ink sponged around the edges, this card looks mighty GRAND, just as a July 4th card SHOULD BE to show respect for this great nation! This is one of the cards we made at my Summer Things with Bling Camp Wannastamp and it's my favorite of all the items we made - including the flip-flops! The recipe is below. All supplies used and shown are from Stampin' Up!, with the exception of Double-Stick Tape.
Recipe:
Paper: Kraft - 8-1/2 X 5-1/2; Soft Suede - 2 X 1-1/2 (4); Very Vanilla Scrap
Stamps: July Fourth (P. 28 of the Summer Mini Catalog); Red, White & Blue Jumbo Wheel (P. 28 of the Summer Mini Catalog)
Inks: Gold Encore; Soft Suede; Night of Navy Marker
Miscellaneous: Stampin' Sponge; Stampin' Dimensionals; Pencil (to mark the center - it helps you line the panels up straight); Stamp-a-ma-jig; Wide Oval Punch; Jumbo Wheel Handle; Kraft Taffeta Ribbon - 2" long; Chocolate Chip Wide Grosgrain Ribbon - 2" long; Scissors; Double-Stick Tape (for taping down the ribbon)
Summer Things with Bling Camp Wannastamp!
 These little boxes are so much fun to make! In the Summer Mini Catalog, Stampin' Up! is offering die-cut, fast-fold boxes! When you coordinate the boxes with the Island Floral Big Shot Die, you get a super-cute party favor box in no time! We made these boxes at my Summer Things with Bling Camp Wannastamp and I love them! I wish Stampin' Up! had them in all different colors - I'd buy them! All supplies used and shown are from Stampin' Up!
Recipe:
Paper: Old Olive - 4 X 3-1/2; Pumpkin Pie - 3-1/2 X 3-1/2; Rose Red - 3-1/2 X 3-1/2; So Saffron - 3-1/2 X 3-1/2; Tempting Turquoise - 2-1/4 X 2-1/4; Whisper White Scrap
Stamps: On a Pedestal (P. 71 of the catalog)
Inks: Old Olive Marker; Pumpkin Pie Marker; Rose Red Marker; So Saffron Marker
Miscellaneous: Island Oasis Party Favor Boxes; Big Shot Machine; Island Floral Die; Paper Piercer with Mat; Large Clear Rhinestone Brad; 1-3/8" Square Punch; Linen Thread - 8" long; Scissors
Friday, June 11, 2010
No New Pool Pictures Today!
I had a stamp camp today and totally forgot about taking pictures until it was already dark! However, there were quite a few workmen in our backyard today laying electrical lines and repairing some of the tile work that we requested be reworked! All of that got finished today, so we are very happy with the pool progress! Robin Owen has promised me that one week after the pool is finished, we will completely forget any frustrations we've felt along the way due to rain delays. It's kind of like childbirth - painful while it's going on, but afterwards, you forget all about it! I like that, Robin, and I'm trusting that you're correct!
Cute Little Tag Sample
 Those of you who know me well know that I like simple things. It's my stamping style! Simple is what attracted me to stamping in the first place - that I could make something cute and quick really GOT me! I've been doing quick and cute for 11 years now - and it's served me well! One of my buddies, Anita, celebrated a birthday, so I gave her a piece of Snicker's Pie from our local Ooh La La Dessert Boutique and tied it up with a ribbon and A CUTE LITTLE TAG! Pink and brown again - I can't seem to move on from that - but the little pink button surrounded by a Chocolate Chip circle and stamped on Pink Pirouette card stock - I'M ALL OVER IT! The pie is great, but THE TAG is better than the pie, I THINK! HAPPY BIRTHDAY, ANITA!
Thursday, June 10, 2010
Nothing Happened Today!
I've had a lesson in patience today! I was informed this morning that the electrician, who was supposed to come and do all his "stuff" today, is behind schedule because of the rain we've had! Nothing else can happen with respect to the pool until the electrician can finish his "stuff." So NOTHING HAPPENED TODAY - and it was a beautiful sunny day that would have been excellent conditions for working on the pool!!! ARGHHHH! He's supposed to be here tomorrow - weather permitting!
Wednesday, June 9, 2010
Pool Process - Step 9!

 Despite the fact that we had a 60% chance of strong thunderstorms today, IT DIDN'T RAIN, so the pool workers finished putting the tile around the pool (that's Hunter's Cove above, a/k/a Starfish Cove), finished the plumbing, filled in all the trenches in the yard, and then set up the pool equipment on the side of our house! Tomorrow? Who knows! The electrician, perhaps? One day at a time! Just hope for sunny skies!
Sweet Scoops Card Sample
 With this summer heat, I'm thinkin' ICE CREAM! Such a cute card - you can't EVER go wrong with pink and brown! I got this idea from Stampin' Connection and I'm wishin' these cute little chocolate chip brads were still available - I didn't buy enough to keep as part of my "stash"! Enjoy the card sample and stop by your local Dairy Queen, Marble Slab - or whatever is in your area - and enjoy a cold, sweet scoop today! Then go home and make a card!
Tuesday, June 8, 2010
Pool Process - Rain, Rain, Go Away!

 Today has been a small disaster! The pool workers started bright and early this morning to finish the plumbing work and Jose started putting the tile around the inside edge of the pool. And then it came - a torrential rain with high winds - and it poured like crazy for about an hour! That was enough to get everything TOTALLY wet and muddy, so the workers packed up and called it a day! ARGHHHH! The only pictures I could get today is a trench with water in it and part of the tile work that Jose did. I think I will really love that tile. It matches the natural stone and our deck, and the cobalt blue adds a nice rich color to the pool. Tomorrow there's a 60% chance of rain and then a 40% chance of rain on Thursday and Friday. If you're experiencing a drought, just build a pool - and it will rain! Darn, now we'll be behind schedule! I'm hearing from a lot of you that you are enjoying watching the process on my blog! I am glad to hear that - I was starting to think it might be boring! Thanks for all your kind words and excitement for us. That means a lot to us!
Monday, June 7, 2010
Pool Process - Step 8!


 Not very pretty pictures today, but it's all part of the process! Bye-bye to ANY grass I had in my backyard! The workers showed up this morning and began digging trenches all over our yard to place pipe into for pool drainage. It started raining, but they kept working, and now it's a big muddy mess in our backyard! They have dug up OUR ENTIRE BACKYARD! They will finish the plumbing tomorrow. The electricians will show up tomorrow to do their thing so we can have pool lights! We'll also have super-cool controls that allow you to change the color of your water through the pool lights! That was something I begged for, especially when they told us that for July 4th, you can put red stripes through the pool! You control the water color electronically with a control panel, and that will be my new best friend! They are also supposed to put the tile around the inside of the pool tomorrow, too - something I can't wait to see! We are expecting a rainy week, though, so things may be delayed - BUMMER!
Elements of Style Card Sample
 Can you tell I'm really enjoying this stamp set? I keep posting samples of it - hope you don't mind - but when it's good, it's good, right? All you do for this look is to stamp on your card stock, first, and THEN run it through the Big Shot with the Square Lattice Embossing Folder! Many of you asked me if you run it through first and then stamp it! It would be too hard to stamp on it after it's been textured! I used Basic Black and Naturals White card stock for this card - a beautiful card that would suit any occasion! ENJOY!
Saturday, June 5, 2010
Pool Process - Step 7!


 We're so glad that Otto has finally gotten accustomed to what's going on in HIS backyard! At least he'll sit on the deck now while Jose and Fernando work. He's been totally perplexed by all of this and wondering what's happened to HIS backyard! Jose and Fernando purchased our tiles for the pool this morning and then spent the entire day cutting rock to fit around our pool and to form the waterfall! I can't imagine how difficult it would be to work with heavy, dusty, hot stone all day in 98-degree temperatures. They did a phenomenal job. Jose would place the stone and the mortar and then Fernando would clean it up, using his hands to shape the mortar, and then cleaning the mortar with a sponge. HARD WORK! Here's our waterfall - and I can't wait to have water pouring over those rocks into the pool. I'm so excited. We wanted a small waterfall - and this one is bigger than we were thinking of - but we're happy with it in relationship to the size of the pool! The workers are taking tomorrow off (boy, they sure deserve a day off, right?) and they'll be back on Monday to place our tile around the inside of the pool! The decking around the pool begins on Monday, too, I believe - and the plumbing!
Medallion Card Sample!
 One of my stampin' buddies, Carolyn Gray, made this gorgeous card! I had it out at my last stamp camp and everyone went ga-ga over it! Carolyn makes beautiful cards - she is an incredibly talented stamper and I'm so LUCKY to have her as part of The TOPICS! Many of you requested that I post it on my blog so you could remember what it looks like, so here it is! It is made with Whisper White and Basic Black card stock - and it's an easel card. Stamp the "Medallion" stamp in Silver Encore ink on Whisper White card stock and then cut it out. Carolyn then ran two pieces of our Glossy White card stock through the Big Shot machine using the Lattice die. Don't forget that you can run both pieces through at the same time! She then just angled them on top of the Medallion and then held them all together with a Filigree Designer Brad. Adhere all of that to a piece of Basic Black card stock! That piece then gets adhered to a piece of Whisper White card stock. I agree - it's over the top - but so is Carolyn!
Friday, June 4, 2010
Pool Process - Step 6!


 WOO HOO! Today is my son's 17th birthday and our 22nd wedding anniversary! A BIG day for the Thomas Family! We've had a fun day together picking out the tile for our pool and watching the workers handcut the stone to go around the top of our pool! This is called the "coping." The first picture is our pool totally encased in gunite, and then Jose and his son Fernando spent the entire day cutting stone for the coping around the pool. Fernando placed the smaller boulders around where the waterfall will be and Jose cut the pieces to fit around the curves of our pool. Tomorrow they will finish the coping and build our waterfall, so that should be fun to watch! We picked out some beautiful cobalt blue tile for our pool to match the tile on our deck. The kids and I got into the pool and staked out our favorite spots and wrote on the gunite with a black Sharpie! We did this same thing when our house was being built, writing our names on the framing as the house went up! Hunter claimed his favorite spot as "Hunter's Cove" and put the date down - which is his 17th birthday! Haley claimed her favorite spot as "Haley's Garden," and I claimed my favorite spot as "Mom's Shelf." It will all eventually get covered up with plaster, but WE know it's under there!
Elements of Style Card Sample
 It doesn't get any easier than this - and it doesn't get any prettier than this, either! I used the Elements of Style stamp set, inked it up with Brocade Blue, and stamped it three times across this 5 X 3-1/2 Sahara Sand notecard-size card! What a gorgeous color combo! Punch out a Brocade Blue flower from the new Punch Pack in the Summer Mini Catalog and attach it to a matching Bitty Button with SNAIL adhesive (you won't be able to see the SNAIL - don't worry)! Attach the button to the card with a Mini Glue Dot and you've got an elegant card in no time! MY KIND OF STAMPING!
Thursday, June 3, 2010
Pool Process - Step 5!


 Once all the reinforced steel was in, the pool workers sprayed the gunite! That is a very loud and messy process! They put tarps up to protect my house and windows because the gunite gets on everything! It took all afternoon to spray the gunite in, and then the workers have to go around and smooth it out. You can see in some of the pictures the gunite looks bumpy, but now it's nice and smooth! They smooth it all out by hand, and they're doing an awesome job! The big shelf you see is a sun-shelf! It has a hole in it so you can place a big umbrella over you! Then you can enjoy being in the pool, but still be protected from the sun! I'll like that! There's also two little bubblers on the sun-shelf that keep the water moving and cool right there, so I know that's going to be my favorite place! Across from the sun-shelf is another little shelf that will be a small waterfall. I wanted to hear the sound of running water. Tomorrow, they'll start the stonework around the pool! It's all coming together!
Subscribe to:
Posts (Atom)