Friday, November 28, 2008

Envelope Gift-Card Holder

Here's another one of the gift-card holders we made at Camp Wannastamp HO HO HO! The Santa is made using punches! It's fun to make and you will definitely put a smile on the face of whomever you give it to. What doesn't show up in the picture is that Santa's hat and beard are covered in glitter, so he razzles and dazzles! For the envelope, just fold it in half. When you open it up, the crease line on the flap is where you will cut. Seal the left side, leaving the right side open to accommodate a gift card! The recipe is below. All supplies used and shown are from Stampin' Up!
Recipe:
Paper: Real Red - 4-1/8 X 2-5/8; Old Olive Designer Paper - 3-7/8 X 2-3/8; Real Red Insert for Gift Card - 4-1/4 X 2-1/2; Real Red Scrap; Whisper White Scrap; Blush Blossom Scrap; Basic Black Scrap; Pink Pirouette Scrap
Stamps: Sweet Serendipity (P. 144); Christmas Classics (P. 32); Punch Pals (P. 37)
Inks: Versamark; Old Olive; Basic Black
Miscellaneous: Whisper White Medium Envelope; Trio Flower Punch; Square Scallop Punch; Word Window Punch; 1-3/8" Circle Punch; 1/4" Circle Punch; Red Striped Grosgrain Ribbon - 12" long; 2-Way Glue Pen; Dazzling Diamonds Glitter; Stampin' Dimensionals; Black Embossing Powder; Embossing Buddy; Heat Tool; Double Circle Punch; Stamp-a-ma-jig

Wednesday, November 26, 2008

Spotlight On Christmas Gift-Card Holder

I think this is my favorite of the items we made at Camp Wannastamp HO HO HO! It's a gift-card holder that I would be HAPPY to find in my stocking on Christmas morning! For the belly band, center the gift-card holder on top of the belly band and then bend the belly band to fit snuggly in front. I held the belly band together with Sticky Strip, which will be hidden once you place the scalloped embellishment on top! The recipe is below. All supplies used and shown are from Stampin' Up!
Recipe:
Paper: Real Red - 6-1/4 X 4-1/4 - score the 6-1/4" side at 2-1/2" and 5-1/4"; Old Olive - 9-1/4 X 1/2"; Real Red scrap; Basic Black scrap; Whisper White scrap
Stamps: Spotlight on Christmas (P. 33); Many Merry Messages (P. 139); Punch Pals (P. 37)
Inks: Basic Black; Real Red; Old Olive
Miscellaneous: Stamp-a-ma-jig; Sticky Strip; Stampin' Dimensionals; Scallop Circle Punch; 1-3/8" Circle Punch; 1-1/4" Circle Punch; 1" Circle Punch; 2-Way Glue Pen; Dazzling Diamonds Glitter

Scallop-Punch Tree Money Holder

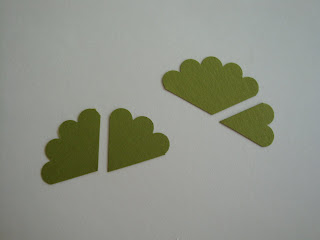
Isn't this adorable? I got this great scallop-punch Christmas tree idea from my stamping buddy, Joy! She made a card like this, and I turned it into a money holder for Christmas. This is one of the money holders we made at Camp Wannastamp HO HO HO! To make the tree, punch out an Old Olive Scallop-Punch circle. Then cut it directly in half, as shown above. Cut five scallops out, which leaves you with two scallops. Then with the other half, cut out four scallops, which leaves you with three scallops - all the pieces you need for your tree! Glue them all together, and use the Word Window Punch for the trunk. Outline the scallops with the 2-Way Glue Pen and add Dazzling Diamonds Glitter! The recipe is below. All supplies used and shown are from Stampin' Up!
Recipe:
Paper: Real Red - 8-1/2 X 7; score at 2-3/8" and 5-1/2" on the 8-1/2" side; Whisper White scrap; Old Olive scrap; Chocolate Chip scrap
Stamps: Heard From the Heart (P. 145); Window Dressing (a hostess set - P. 22 ); Punch Pals (P. 37)
Inks: Basic Black
Miscellaneous: Black Gingham Ribbon - 20" long; Stamp-a-ma-jig; Wide Oval Punch; Sticky Strip; Scallop Circle Punch; Word Window Punch; 2-Way Glue Pen; Dazzling Diamonds Glitter

Tuesday, November 25, 2008

Christmas Chatter Money Holder

This is one of my favorites! I love things that look natural and earthy! This is a little pillow box we made using the Big Shot Pillow Box Die! It's already scored for you in just the right places, so all you have to do is fold it and tape it together! I'm loving my Big Shot! This die is slightly shorter than a gift card, but it's perfect for folding up a $20 bill and placing it inside! What a great stocking stuffer! The recipe is below. All supplies used and shown are from Stampin' Up!
Recipe:
Paper: Kraft - 5-3/4 X 5, which you then run through your Big Shot Machine to get the pillow box; Kiwi Kiss Scrap and Real Red Scrap for the tag
Stamps: Christmas Chatter Jumbo Wheel (P. 197); Everyday Flexible Phrases (P. 143)
Inks: Chocolate Chip
Miscellaneous: Sticky Strip; Alpine Ribbon Originals (P. 23 of the Holiday Mini Catalog) 15" long; Small Tag Punch; 1/8" Hole Punch; Rope Twine (P. 23 of the Holiday Mini Catalog) 7-1/2" long; Small Star Punch; 1/4" Circle Punch; Paper Piercer with Mat; Antique Brass Brad; Mini Glue Dots

Christmas Classics Gift-Card Holder

This past weekend, I had Camp Wannastamp HO HO HO, which was composed of Christmas gift-card holders and money holders, so stay tuned while I post all of them on my blog! This is one of the gift-card holders we made - and everyone loved it! I think it's classy - even appropriate for a man! The recipe is below. All supplies used and shown are from Stampin' Up!, with the exception of the mini kraft sack, which can be found at Hobby Lobby in the rubber-stamp aisle!
Recipe:
Paper: Very Vanilla - 1-3/4 X 1-1/2; Always Artichoke - 1-7/8 X 1-5/8; Very Vanilla (the inside piece that the gift card sits on) 3-3/4 X 2-1/4; Real Red Scrap for the tab
Stamps: Christmas Classics (P. 32); So Swirly Jumbo Wheel (P. 198)
Inks: Always Artichoke; Real Red Marker; Always Artichoke Marker
Miscellaneous: Mini Kraft Sacks; Riding Hood Red/Vanilla Grosgrain Ribbon - 5-3/4" long; Stampin' Dimensionals; Paper Piercer with Mat; Antique Brass Brads (5); 1/2" Circle Punch; Jumbo Wheel Handle

Thursday, November 20, 2008

Cheer Ornament

I told you I was looking for anything I could use for a rub-on! Isn't this a fun idea? I took a clear glass Christmas ornament, filled it with scraps of compatible colors of ribbon, and then used the "Join in the Cheer" Decorative Strip for the Big Shot to make a white vinyl rub-on! It would have been really neat to use red ribbons instead of pink, celery, and white, but I'm still enjoying just having this on my desk! It definitely "cheers" me up! I took a 4" strip of ribbon, rolled it around my finger, then used a Mini Glue Dot to hold it together, and then dropped it into the glass ball! It takes about 50 ribbons to fill the ball, but it's well worth it when you're finished! All supplies used and shown are from Stampin' Up!, with the exception of the Christmas ornament.

Wednesday, November 19, 2008

Snow Swirled Snowflake Card

This snowflake card makes me melt! My stamping friend, Elizabeth, shared this card with us at our last Demo Day held by The TOPICS! and we all couldn't wait to run home and make it! The recipe is below! All supplies used and shown are from Stampin' Up!
Recipe:
Card Stock: Bashful Blue; Whisper White
Stamps: Baroque Motifs (P. 120); Snow Swirled (P. 32); Heard from the Heart (P. 145)
Inks: Bashful Blue; Craft White
Miscellaneous: Top Note Die for the Big Shot; White Embossing Powder; Heat Tool; Sponge Dauber; Dazzling Diamonds Glitter; 2-Way Glue Pen

Tuesday, November 18, 2008

"Join in the Cheer" Decorative Strip Big Shot Rub-On

Okay, I've been walking around my house trying to put rub-ons on everything! I've gone rub-on crazy! A couple of weeks ago, Danielle, a member of The TOPICS!, showed us how to run vinyl sheets through the Big Shot to make our own rub-ons and I caught the fever! She showed us how to make this cute little pail and then I, in turn, had to show everyone at my Merry & Bright Camp Wannastamp how to do it! It's easy and fun - and of course Stampin' Up! sells the vinyl sheets in Kraft, White, Basic Gray, and Chocolate Chip! Wouldn't it be cute to have baked cookies or fudge in the pail for Christmas gifts? All supplies used and shown are from Stampin' Up!, with the exception of the red pails, which can be found in the $1 spot at Target. My friend Elizabeth ran all over town getting red pails for me and I'm so appreciative! Thanks, Elizabeth, YOU ARE THE BEST!

Monday, November 17, 2008

Fabulous Flowers Angel

Isn't she cute? I saw this angel on a display board at the Stampin' Up! convention last summer and I couldn't wait to make her! Isn't it fun that she's made from the Fabulous Flowers stamp set? She is stamped in Baja Breeze ink on Whisper White card stock. The pearl, crystal, and hat pin are from our Pretties Kit. The picture tutorial below will show you how to make her. All supplies used and shown are from Stampin' Up! Using the Fabulous Flowers stamp set, stamp two of the big flowers for the angel's gown and one small flower for her wings.
Completely cut out one image exactly the way it is. For the second image, eliminate the bottom row of petals. With the small flower, cut out three of the petals and then remove the middle one to resemble wings.
Cut directly to the center of both flowers and place Sticky Strip down one side of your cut.
Fold the flower over and adhere the Sticky Strip to the other side, creating a dome.
Using a 2-way glue pen, fill in the bottom row of petals with glue on the bigger flower and then sprinkle Dazzling Diamonds glitter over it. On the smaller flower layer, fill in all of the petals with 2-way glue and sprinkle Dazzling Diamonds glitter all over it. Paper-pierce a hole in the center of each flower and thread your hat pin through the two layers with a pearl from the Pretties Kit as the angel's head and a crystal bead as the angel's body. I stuck several mini glue dots underneath her gown to the hat pin to keep her gown from slipping down. I also used a mini glue dot to adhere her wings to the crystal bead! Pretty, pretty!

Sunday, November 16, 2008

Samples of On Board Trinkets and Star Bright Ornaments

I wish I had taken more pictures at the Merry & Bright Camp Wannastamp, but I did manage to catch a few snapshots of some of the creations people came up with! Of course, pictures never do justice - you have to see them in person to appreciate their splendor! Glitter in a picture just isn't the same - you have to be there to experience the glitz! These ornaments were created by Gina, Tina, Melissa, and Nancy - good stampin' buddies of mine! All supplies used and shown are from Stampin' Up!

On Board Trinkets and Star Bright Ornament Kits

Wow, I had an incredibly fun time at the Merry & Bright Camp Wannastamp yesterday and Friday! This event was a departure from what I normally do, but it proved to be great fun and the gals attending made some absolutely fabulous ornaments! It became a show-and-tell day, with lots of ooohing and aaahing going on - and we certainly copied each other's ornaments! I love my new ornaments and now I'm in the mood to make even more! Have lots of supplies on hand, though, because you'll want to pull out tons of brads, ribbons, papers, punches, glitter, and, well, anything you have to create gorgeous and fun ornaments! Thanks to those of you who participated - I had so much fun spending the day making ornaments with you! All supplies used and shown are from Stampin' Up!, with the exception of the metal tree!

Wednesday, November 12, 2008

Flight of the Butterfly 2009 Calendar

It will make me VERY HAPPY every day in 2009 just to have this on my desk! This is one of the projects we made at the Cimarron Elementary School fund-raiser for the fifth-grade class, and it will also be one of the calendars we'll make at an upcoming calendar class I'm having in December! The recipe is below. All supplies used and shown are from Stampin' Up!, with the exception of the coaster and the calendar!
Recipe:
Paper: Pumpkin Pie - 4 X 4; Summer Picnic Designer Paper or Pumpkin Pie Designer Paper - 4 X 4; Whisper White - 4 X 1; Apricot Appeal - 4 X 1-5/8; Apricot Appeal - 3-1/8 X 2-1/4; Apricot Appeal - 7-1/2 X 1 and score at 2-1/2", 5", 6" and 7"; Apricot Appeal Scrap; Pumpkin Pie Scrap; Whisper White Scrap
Stamps: Flight of the Butterfly (P. 97)
Inks: Basic Black; Pumpkin Pie
Miscellaneous: Seeing Spots Brass Template; Stylus Tool; Light Table; Paper Piercer with Mat; Black Brad; Scallop Edge Punch; White Signo Gel Pen; Scallop Circle Punch; 1-3/8" Circle Punch; 1-1/4" Circle Punch; 1" Circle Punch; Paper Snips; Mini Glue Dots; 2-Way Glue Pen; Dazzling Diamonds Glitter; Stampin' Dimensionals; 2009 Calendar; Coaster; Stamp-a-ma-jig

Tuesday, November 11, 2008

Season of Friendship Redbird Card

Wow! I think this card is going to be one of my favorites this holiday season! Doesn't the redbird look so cute perched up on that limb? This is one of the cards that we made at the Cimarron Elementary School fund-raiser for the fifth-grade class! It's also one of the cards that is part of the 4-card pack we've been making at the Christmas Card Workshops in your homes! The recipe is below. All supplies used and shown are from Stampin' Up!
Recipe:
Paper: Real Red - 11 X 4-1/4; Whisper White - 5-1/4 X 4; Kraft - 5 X 3-3/4; Kraft scrap for the redbird
Stamps: Season of Friendship (P. 6 of the Holiday Mini Catalog); Hugs & Wishes (P. 141)
Inks: Close to Cocoa; Real Red; Versamark
Miscellaneous: Stampin' Dimensionals; Embossing Buddy; White Embossing Powder; Heat Tool; 3/4" Circle Punch; Red Hemp - 12" long

Monday, November 10, 2008

Sleigh Bells Ring Christmas Card

This Christmas card is quick, easy, but absolutely gorgeous! There is Dazzling Diamonds glitter all over this card, which you can't see in the picture, but it shimmers and sparkles! This is another card that we made at the Cimarron Elementary School fund-raiser for the fifth-grade class! The recipe is below. All supplies used and shown are from Stampin' Up!
Recipe:
Paper: Real Red - 5-1/2 X 4-1/4; Whisper White - 8 X 5-1/4; Real Red - 3-1/8 X 2-7/8; Whisper White - 3 X 2-3/4
Stamps: Sleigh Bells Ring (P. 42)
Inks: Real Red
Miscellaneous: Real Red Wide Grosgrain Ribbon - 16-1/2" long; Stampin' Dimensionals; 2-Way Glue Pen; Dazzling Diamonds Glitter

Saturday, November 8, 2008

Party Hearty Birthday Card!

Doesn't this just look like something you should eat? These colors look like candy together and they really POP! A stamping fund-raiser was held at Cimarron Elementary School for the fifth-grade class - and this is one of the cards that everyone got to make! The recipe is below. All supplies used and shown are from Stampin' Up!
Recipe:
Paper: Rose Red - 11 X 4-1/4; Whisper White - 2 X 1-3/4; Rose Red - 2-1/8 X 1-7/8; Regal Rose - 2-1/4 X 2; Kiwi Kiss - 2-1/2 X 2-1/4; Whisper White scrap for the doodah in the center of the "B"!
Stamps: Polka Dot Background (P. 135); Party Hearty (P. 63)
Inks: Rose Red; Kiwi Kiss
Miscellaneous: Regal Rose Wide Grosgrain Ribbon - 14-1/2" long; Stampin' Dimensionals; 3/4" Circle Punch; Paper Piercer with Mat; Silver Brad