Tuesday, September 29, 2009

Some Halloween Extras!

Isn't this Frankenstein just the cutest thing you've ever seen! I received this card from my stampin' buddy, Danielle Adams, and I ran home and immediately put him on my mantel! It's a 3 X 3 card - and I think Danielle used the 1" circle punch and the 3/4" circle punch for his eyes, and the 3/4" circle punch for his nose. His hair is our Scallop Edge Punch! CUTE, DANIELLE!
I've also taken a picture of my Halloween tree, just for fun! Halloween is going to be over way too fast for my liking!
I also attempted to make some of the witch's hats you've been seeing all over, and I must admit there's a bit of a learning curve that goes along with it! My hats didn't turn out spectacularly well, but I had fun making them! You start with a 3-1/2" circle, cut it directly in half, line the outer curved edges with Sticky Strip (and also halfway up one of the straight sides), and then you roll the curved edge along the bottom of a mini peanut butter cup about 1/4" up from the bottom of the cup. It creates a cone! I didn't like having part of the cup showing, so I wrapped ribbon around mine and secured it with Sticky Strip. Then I used our Scallop Punch for the bottom of the hat! I wish I had put stars and glitter all over my hats - oh, well, maybe next year!!!! I'm done with Halloween and on to my Christmas planning!

Sunday, September 27, 2009

Fright Night Camp Wannastamp!

Oh, wow! This project REALLY gets me in the mood for Halloween! Isn't it just downright fun? I love the fact that I can make projects like this in the comfort of my own home using fabulous Stampin' Up! products! I saw a sample of this witch's hat on a display board at the convention this past summer and I knew immediately I'd have to make it for my Fright Night Camp Wannastamp! I cased it completely from that sample! The recipe is below. All supplies used and shown are from Stampin' Up!, with the exception of the candy inside! Recipe: Paper: Basic Black - 11 X 4-1/4 - scored at 5-1/2" and then from the midpoint of each end to the outer end of the center score line on each side; Lavender Lace - 3 X 3; More Mustard - 4 X 3/4"; Basic Black - 6-3/4 X 1-1/2; Whisper White scrap; Pumpkin Pie scrap Stamps: Eat, Drink & Be Scary (P. 25 of the catalog) Ink: Black Miscellaneous: Pumpkin Pie Striped Grosgrain Ribbon - 8" long; Scissors; 1/8" Hole Punch; Candy; Sticky Sheets; Small Star Punch; Fine Cosmo Purple Glitter; 3/4" square punch (retired); Curly Label Punch; Paper Snips; Sticky Strip; SNAIL Adhesive; Small Tag Punch; Large Tag Punch; 1/16" Hole Punch; Silver Cord - 4" long; Paper Scorer; Bone Folder; 2-Way Glue Pen; Mini Glue Dots; lots of time and patience!

Fright Night Camp Wannastamp!

Here's a cute little candy caddy for all the trick-or-treaters in your life! This is one of the items we made at the Fright Night Camp Wannastamp! You use the Box #2 Big Shot die! Cut off the little flaps on the sides and then cut off part of the flap on the lid; stick two boxes together with Sticky Strip; and you get a nice little candy caddy! This idea would work for any holiday or any occasion! The recipe is below. All supplies used and shown are from Stampin' Up!, with the exception of the candy! Recipe: Paper: Basic Black Textured - 12 X 6 (2); Night & Day Specialty Designer Series Paper (the black with white polka dots) - 3-1/2 X 1-3/4 (2); Night & Day Specialty Designer Series Paper (the white with black polka dots) - 3-3/8 X 3-1/4 (2); Whisper White scrap; Textured Basic Black scrap (use the leftover scraps from the paper you run through the Big Shot!) Stamps: Grateful Greetings (P. 12 of the Holiday Mini Catalog) Ink: Black Miscellaneous: Scallop Edge Punch; SNAIL Adhesive; Large Oval Punch; Sticky Strip; 1-3/8" Square Punch; 1-1/4" Square Punch; Stampin' Dimensionals; Pumpkin Pie Striped Grosgrain Ribbon - 20" long; Pumpkin Pie Striped Grosgrain Ribbon - 5" long; Scissors; Candy; The Big Shot; Box #2 Die; Extended Cutting Pads; Extended Premium Crease Pad

Fright Night Camp Wannastamp!

Ohhhh, this little mummy is so cute, although he's trying sooooo hard to be scary with those googly eyes shifting back and forth. I'm going to set him on my kitchen counter and just look at him for weeks. He's too cute!!! He's just one of the items we made at the Fright Night Camp Wannastamp. The recipe is below. All supplies used and shown are from Stampin' Up!, with the exception of the googly eyes and the miniature Hershey's chocolate bar! Recipe: Paper: Creamy Caramel - 4 X 3; scored at 1", 1-3/8", 2-5/8", and 3"; Whisper White - 3 X 1-1/4; Basic Black scrap Stamps: NONE! Ink: Creamy Caramel Miscellaneous: Stampin' Sponge; SNAIL Adhesive; 1/4" hole punch (for his eyes - he hasn't slept in a million years); Googly Eyes; 2-Way Glue Pen; Miniature Hershey's Chocolate Bar; Paper Snips; Sticky Strip

Fright Night Camp Wannastamp!

Here's a project we made at the Fright Night Camp Wannastamp! It's a small cellophane bag tote holding three 2 X 2 cards expressing your Halloween wishes! These little 2 X 2 cards are great Halloween gift tags (maybe you'd like to place them on a candy bar), but they also look adorable decorating a shelf during Halloween! This little tote makes a fun party favor as well! The recipe is below. All supplies used and shown are from Stampin' Up! Recipe: Paper: Cast-A-Spell Designer Series Paper - 5 X 2-3/4; Whisper White - 2-1/2 X 1-3/4; Pumpkin Pie - 4 X 2; Old Olive - 4 X 2; Perfect Plum - 4 X 2; Pumpkin Pie scrap; Perfect Plum scrap; Old Olive scrap; Whisper White scrap Stamps: Grateful Greetings (P. 8 of the Holiday Mini Catalog); Halloween is a Hoot (P. 23 of the catalog) Inks: Basic Black; Old Olive Marker; Perfect Plum Marker; Chocolate Chip Marker; More Mustard Marker; Pumpkin Pie Marker Miscellaneous: SNAIL Adhesive; Stamp-a-ma-jig; Small Cellophane Bags; Word Window Punch; 1-3/8" Circle Punch; 1-1/4" Circle Punch; Old Olive Wide Grosgrain Ribbon - 8" long; Scissors

Fright Night Camp Wannastamp!

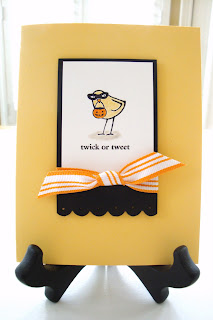
This little bird is making me crazy! I think he is the cutest little thing how he's hiding behind a mask - like we're not going to know who he is! This is one of the items we made at the Fright Night Camp Wannastamp! I cased this card from http://www.splitcoaststampers.com/ and changed it slightly to meet my purposes! As far as the 2 X 2 squares go, I simply cut them from one corner to the opposite corner and then placed the pieces together to get the geometric design. The recipe is below. All supplies used and shown are from Stampin' Up! Recipe: Paper: Basic Black - 11 X 4-1/4; Basic Black - 5-1/4 X 4; Night & Day Specialty Designer Paper (the herringbone print) - 4 X 2; Basic Black - 4 X 1; Dusty Durango - 2 X 2; Rich Razzleberry - 2 X 2; Old Olive - 2 X 2; Night & Day Specialty Designer Paper (the clear acetate sheet with black dots) - 4 X 2; Whisper White scrap Stamps: Twick or Tweet (P. 10 of the Holiday Mini Catalog) Inks: Basic Black; Dusty Durango; Rich Razzleberry; Crushed Curry Marker Miscellaneous: SNAIL Adhesive; Scallop Edge Punch; Uni-ball Signo White Gel Pen; 1-1/4" Black Striped Grosgrain Ribbon - 15-1/2" long; Scissors; 1-1/4" Circle Punch; 1-3/8" Circle Punch; Stampin' Dimensionals; Word Window Punch; Blender Pen; 1-3/4" Circle Punch; Black Miniature Library Clip

Fright Night Camp Wannastamp!

Anytime you can see candy through a window, it makes me smile! This is a project we did at the Fright Night Camp Wannastamp. I love the new Sweet Treat cups! They are fun to play with! The recipe is below. All supplies used and shown are from Stampin' Up!, with the exception of the candy corn and the lollipop sticks! Recipe: Paper: Basic Black - 5-3/4 X 3-1/8; Whisper White - 3-1/2 X 3-1/2 - then cut down to size! Stamps: Sweet Centers (P. 6 and 7 of the Holiday Mini Catalog) Inks: Old Olive; Rich Razzleberry Marker Miscellaneous: 1-3/4" Circle Punch; Sweet Treat Cups; Sticky Strip; Stampin' Dimensionals; Lollipop Sticks; Candy Corn; 1-1/4" Circle Punch; Rich Razzleberry Polka-Dot Grosgrain Ribbon - 6" Long; Paper Snips

Wednesday, September 23, 2009

Fall and Halloween Cards!

This time of year is my favorite for stamping! I love the fall colors and I adore the fun of Halloween! I am posting these cards just for fun - the recipes aren't attached! I am sure I cased them from http://www.splitcoaststampers.com/! The Little Boo card was my Founder's Circle swap! I think he's so cute! Have a great fall and a fun Halloween!

Saturday, September 19, 2009

Founder's Circle Trip - Day 4!

Inside the box were these cute butterfly charms! One of them is engraved with "Founder's Circle 2009." Thank you, Stampin' Up!, for a fabulous trip! I made new friends, spent time with some old friends, learned new things, and now I need to get back home and get back to work so I can come again next year!
When I returned to my room this evening, there was a cute little present on my bed! Tomorrow night when I go home, I'm going to miss all of these little surprises on my bed!
Here is the sunset view from where we were all eating! It doesn't get any better than that!
During dinner, there was a gentleman who played beautiful piano music for us! The whole evening was so nicely done and so pleasant!
Shelli spoke to us about how much she enjoyed the trip and how special she feels we all are! We all feel that she's pretty special, too!
One of my butterflies stayed at our table for quite a while, but then it finally decided to take off! Our tablecloths were patterned after our Cottage Wall Designer Series Paper!
We were each given a little box with instructions not to open it until we were told to! We discovered that inside each box were two butterflies! Everyone opened their boxes at the same time and we watched the butterflies fly away! It was a very special moment!
Once we arrived at The Ledges, we had a group photo taken and then we were seated at these beautiful tables! In the background were the majestic mountains of Utah - it was indescribable!
Kimberly Van Diepen and Lisa Freeman having a good time on the bus on the way to The Ledges!
We boarded a bus at 5:30 p.m. and headed to a secret location - The Ledges - for dinner. Can you see that gorgeous mountain in the background? It really just takes your breath away!
Here are the GREATEST Stampin' Up! employees posing for photos! They're the best - and they worked their rear-ends off during this trip! They really did a fabulous job!
What a fun last day I've had for the Founder's Circle trip! I got to sleep in this morning and then attended a class on the My Digital Studio software. I am so excited about this new product and I can't wait to sink my teeth into it and produce and print some incredible projects! I relaxed most of the day - which was such a treat! Anita K., I had this picture with Angie Juda taken JUST FOR YOU because I know how much you love her blog! The best part is she's as sweet as can be and I enjoyed getting to know her a little better! See the beautiful Decor Elements butterflies in the background?

Founder's Circle Trip - Day 3!

Upon returning to my room this evening, I found these adorable garden shoes on my bed, patterned after the Cottage Wall Designer Series Papers! What an absolutely wonderful day - I've had a total blast! Thank you, Stampin' Up!, for making me feel so special!
After the business swap, you can hang out in the Gathering Place and visit with your Stampin' Up! buddies - one of my favorite things to do - they speak my language!
Fun cocktails to enjoy at the pajama party!
A close-up of the butterfly cupcakes! Aren't they cute?
After swapping cards, we had our business swap, but not until we each got to enjoy eating a butterfly cupcake and sipping on a fabulous cocktail! The whole "Bloom & Grow" theme has followed throughout our entire stay!
Here we are lining up in our pajamas for the notorious "pajama party/card swap/business swap"! We line up the entire length of the hotel and swap cards! I got some gorgeous swaps this year that I'll be so happy to share with you when I return home!
When we returned to the hotel, I saw Jill Olsen's car sporting one of our rub-ons on her back window! Doesn't it look great? Somehow, I don't think it would look the same on my big old Ford Expedition!
The Kanab park playground is cushioned with leftover rubber scraps that are shredded and shipped to parks all across the United States! Here is Debbie Moczek, Debbie Naylor, Missy Shipman and me enjoying the playground!
I'm going to be a name-dropper! Here I am posing with Mary Fish! I told her my friends would be impressed if I had my picture taken with her! She was very accommodating - and as cute as a button, too!
This is me and my buddies Debbie Moczek and Beckie Kareck posing with a beautiful backdrop!
Here's a shot of the whole group enjoying our lunch together! That's Ann Clemmer and Jill Olsen up front!
My creme brulee dessert!
Me and my lunch bucket!
After our tour, we boarded the bus again and headed to a beautiful park in Kanab, where we were treated to these cute little Certainly Celery and Whisper White buckets that contained our lunches, along with a little square cloth napkin. At the very bottom of the buckets were shredded Cottage Wall Designer Series Papers. It was so pretty, you almost didn't want to eat your lunch and mess up the gorgeous presentation!
Unfortunately, we were not allowed to take photographs in the actual plant, but I must tell you that it is spic-and-span clean and runs like a top! The employees take a lot of pride in their work - and they LOVE Shelli and feel quite a loyalty to her! This is our tour group posing in the lobby with our tour guide! It was a fun tour! I could have stayed for hours.
Here I am posing with Shelli in her apartment! I feel like a lucky girl! Isn't she just precious?
This is Shelli's living room in her apartment! As you look through the windows, you see the beautiful mountains of Utah in the distance! I could be happy living here, and I was so pleased that we were able to visit her apartment.
Shelli has an apartment on the second floor of the manufacturing plant where she stays during her visits to Kanab. This is her kitchen table and kitchen. Everywhere you look, you can see her special touch with flowers, Decor Elements, and her stencilling on the walls! It's such a fun place to visit and it feels very warm and cozy!
In the main entryway, there is a beautiful fireplace that has the Stampin' Up! logo on it, which you can't see in this picture! My friend Beckie Kareck and I posed together!
Here I am with Josh Adams from the Human Resources Department at the plant! I begged him for a job with Stampin' Up!, but it didn't work! Drat!
As you walk into the doors of the Stampin' Up! manufacturing facility, there's a plaque you can see that Stampin' Up! has posted for their employees!
All along the way was the most beautiful scenery to enjoy! Utah is, without a doubt, one of the most beautiful states I've ever seen!
Here we are in the bus on the way to Kanab doing our "jazz hands" for the camera! Can you see me in the upper right corner?
A snack basket was passed around during the trip that was filled to the brim with snacks and goodies! I loaded up with Heath bars, crackers, licorice, trail mix, and cookies - just enough to get you good and sick!
Oh, boy, what an incredible day I've had today! We boarded a bus at 8:00 a.m. and drove to Kanab, where the Stampin' Up! manufacturing facility is. Along the way, we played games in the bus and won Stampin' Up! merchandise. I came home with our fabulous HO HO HO chipboard and our red polka dot ribbon!