Sunday, November 24, 2013

Christmas Card Workshop 2013

One of my favorite events of the year is my Christmas card workshop!  It is such a fun day to ring in the season with my stamping friends by making beautiful cards to send to our loved ones!  I had a total blast with everyone over the last several days as we drank hot cocoa, listened to Christmas music, and stamped our Christmas cards.  Below are the cards we made for this year's workshop.


Here's Card No. 1 of my Christmas card workshop.  Anything that is white on white or vanilla on vanilla will always be my favorite!  I love the crisp cleanness of this noel card.  Some of my stamping friends used a silver glimmer star or a red glimmer star - and it was fabulous that way, too!  I have no idea who originally designed this card.  The recipe is below.  All supplies used and shown are from Stampin' Up! - the greatest rubber stamp company in the world!

Recipe:

Paper:  Whisper White - 8-1/2 X 5-1/2; Whisper White - 5-1/4 X 4; Whisper White - 1-3/4 X 1-3/4 (for the Big Shot letters); Whisper White scrap or Silver Glimmer Paper or Red Glimmer Paper (for the star)
Stamps:  None
Inks:  None
Miscellaneous:  Stampin' Dimensionals; Typeset Alphabet Die; Big Shot; Mini Glue Dots; Merry Minis Punch Pack (star punch); Rhinestone Jewels; Paper Snips

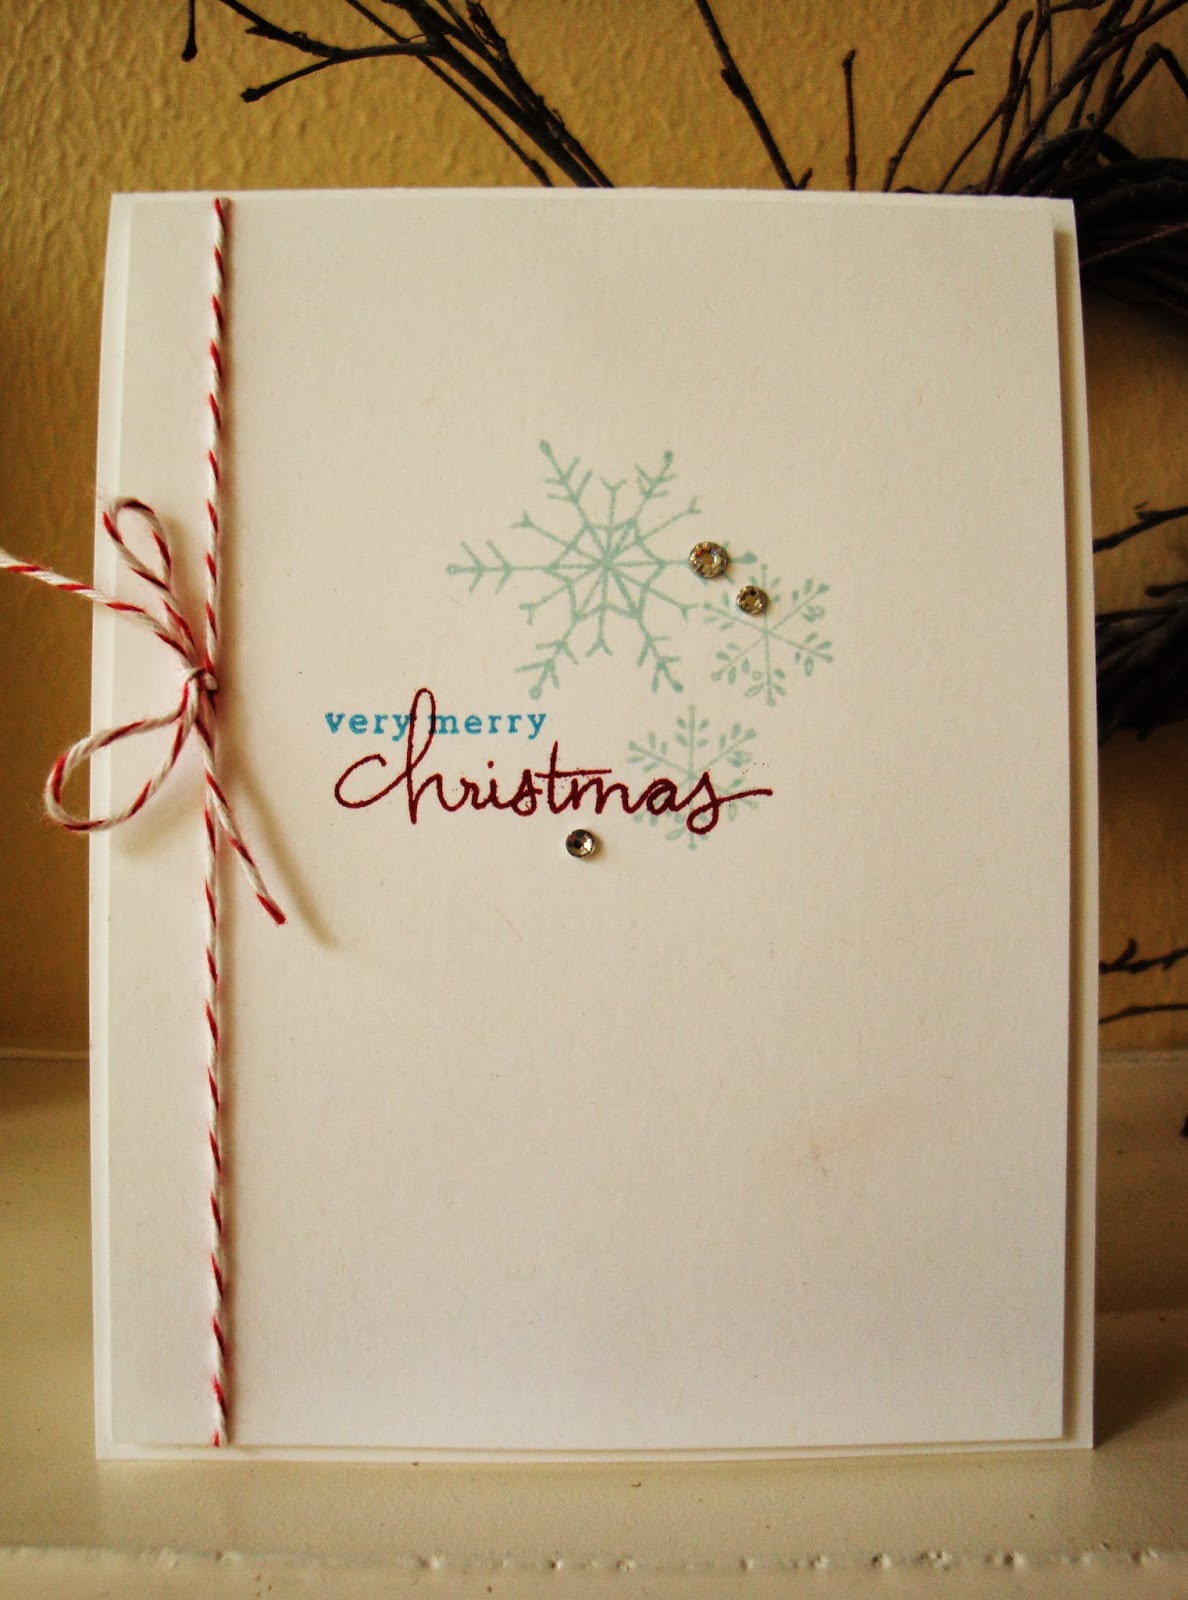
Card No. 2 of my Christmas card workshop.  This adorable card reminds me of a candy cane!  It was originally designed by Bonnie Klass.  The recipe is below.  All supplies used and shown are from Stampin' Up!


Recipe:

Paper:  Cherry Cobbler - 8-1/2 X 5-1/2; Whisper White - 5-1/4 X 4; Cherry Cobbler - 3-3/4 X 2-3/4; Whisper White - 3-1/2 X 2-1/2
Stamps:  Merry Little Christmas
Inks:  Old Olive Marker; Cherry Cobbler Marker
Miscellaneous:  Stylish Stripes Embossing Folder; Big Shot; Stampin' Dimensionals; Cherry Cobbler Seam Binding Ribbon - 12" long; Rhinestone Jewels; Mini Glue Dots; Craft Scissors; Paper Snips; SNAIL Adhesive; Stamp-a-ma-jig

Card No. 3 of my Christmas card workshop.  This was almost everyone's favorite of all the cards.  The Silver Glimmer Paper peeking out from underneath the white top layer is so handsome!  I received this card in a card swap from Donna Gustafson during our Annual Demonstrator Retreat this past October.  It was perfect for my Christmas card workshop.  The recipe is below.  All supplies used and shown are from Stampin' Up!

Recipe:

Paper:  Whisper White - 11 X 4-1/4; Red Glimmer Paper - 5-1/4 X 4; Whisper White - 5-1/8 X 3-7/8; Whisper White - 3-7/8 X 1-3/4
Stamps:  Lovely as a Tree; Greetings of the Season
Inks:  Early Espresso; Old Olive Marker; Early Espresso Marker
Miscellaneous:  Stampin' Dimensionals; Sticky Strip; Stamp-a-ma-jig; 2-Way Glue Pen; Dazzling Diamonds Glitter; Cherry Cobbler Dazzling Details

Card No. 4 of my Christmas card workshop.  Oh, boy!  To me, it doesn't get any better than this!  Very elegant, soft and white - luscious for Christmas!  I have no idea who originally designed this card, but to whomever it was, THANK YOU for rocking my stamping world with this card!  The recipe is below.  All supplies used and shown are from Stampin' Up!


Recipe:

Paper:  Whisper White - 11 X 4-1/4; Whisper White - 4-1/4 X 1-3/4; Card Stock Vellum (for the poinsettia)
Stamps:  Joyful Christmas; Teeny Tiny Wishes
Inks:  Versamark
Miscellaneous:  Stampin' Dimensionals; Pretty Print Embossing Folder; Big Shot; Silver Embossing Powder; Heat Tool; Stamp-a-ma-jig; Iridescent Ice Embossing Powder; Paper Snips; Pearl Jewels

Card No. 5 of my Christmas card workshop.  This was another favorite of everyone's!  It looks so wintery and the Dazzling Diamonds Glitter finishes it off beautifully.  I have no idea who originally designed this card.  The recipe is below.  All supplies used and shown are from Stampin' Up!


Recipe:

Paper:  Whisper White - 8-1/2 X 5-1/2; Whisper White - 5-1/4 X 4; Whisper White - 5-1/4 X 1-3/4
Stamps:  Lovely as a Tree; Special Season
Inks:  Versamark; Soft Sky; Smoky Slate
Miscellaneous:  Stampin' Dimensionals; Stamp-a-ma-jig; Silver Embossing Powder; White Embossing Powder; Heat Tool; 2-Way Glue Pen; Dazzling Diamonds Glitter; Stampin' Sponges

Card No. 6 of my Christmas card workshop.  I'm so glad I got this stamp set before it became unavailable!  I love it and will use it for many years to come!  This card design is from Stampin' Up!  The recipe is below.  All supplies used and shown are from Stampin' Up! 


 Recipe:

Paper:  Whisper White - 11 X 4-1/4; Whisper White - 5-1/4 X 4
Stamps:  Endless Wishes
Inks:  Cherry Cobbler; Marina Mist; Soft Sky; Pool Party
Miscellaneous:  Stampin' Dimensionals; Cherry Cobbler Baker's Twine - 17-1/2" long; Craft Scissors; Rhinestone Jewels; Paper Snips

Merry Christmas, Everyone!

Friday, November 15, 2013

Happy Winter Sampler


The very first stamp set I purchased many, many, many years ago was "Happy Winter."  Funny thing is, it's still my favorite stamp set of all time!  I love the snowman, I love the simple tree and the delicate snowflakes, and the greeting is perfect.  This little stamp set has significant meaning to me because it all started here!  I pulled this old stamp set out the other day and felt the urge to make a winter sampler with it.  Here's what I came up with.  Hope you like it!  I will post the recipe soon, but I'm off in a mad dash to the Home for the Holidays Gift Market at the Merrell Center here in Katy, Texas today through Sunday where I have a booth to offer my little Happy Winter sampler for sale.  All I could make were 30 samplers and I hope my little snowmen find good homes!

Okay - the dust has settled, so here's the recipe!

Recipe:

Paper:  Very Vanilla - 8 X 8 - scored at 7" and 7-1/4" inches on all four sides; Silver Glimmer Paper - 5-1/2 X 5-1/2; Soft Sky - 5-1/4 X 5-1/4; Very Vanilla - 5 X 5; Very Vanilla - 4-1/4 X 4-1/4 (this piece is embossed with the Polka Dot Embossing Folder); Silver Glimmer Paper - 3-1/4 X 3-1/4; Very Vanilla - 3 X 3 (this piece is embossed with the Square Lattice Embossing Folder); Very Vanilla - 1-3/8 " squares punched out using the 1-3/8" Square Punch
Stamps:  Happy Winter (retired)
Inks:  Basic Black
Miscellaneous:  1-3/8" Square Punch; Postage Stamp Punch; 1" Square Punch; Stampin' Dimensionals; Sticky Strip; Simply Scored Scoring Tool; Pearl Jewels; Paper Snips; Victoria Lace Trim; Linen Thread; Mini Glue Dots; Vintage Faceted Button; Subtles Button

Monday, November 11, 2013

Fall Sampler


Continuing on with the sampler mania my customers and I have been experiencing, here's the next one in our series - a fall sampler!  There were so many gorgeous samplers produced this past weekend at my house - and I tried to bribe a couple of people into selling their samplers to me because I liked theirs better than mine, but it was to no avail!  This time around, I didn't want all of the usual "bling" that we typically put on our samplers out of respect for Thanksgiving - just wanted it to be simple, but elegant!  Hope you like it!


Paper:  Very Vanilla - 8 X 8; scored at 2-7/8", 3", 3-1/8"; 5-3/4", 5-7/8", and 6"; Cajun Craze - 4-7/8 X 4-7/8; Gold Foil - 4-3/4 X 4-3/4; Very Vanilla - 4-1/2 X 4-1/2; Crumb Cake strips and Very Vanilla strips for the squares.  Each square was embossed at 5/8", 3/4", and 7/8"
Stamps:  French Foliage; Truly Grateful; Harvest Blessings; Autumn Leaf Prints; With Gratitude; Lexicon of Leaves; Summer Silhouettes; Lovely as a Tree; Gently Falling; Seasonal Sayings
Inks:  More Mustard; Cherry Cobbler; Old Olive; Always Artichoke; Elegant Eggplant; Pumpkin Pie; Tangerine Tango; Early Espresso; Crumb Cake; Soft Suede Marker; Early Espresso Marker; Pear Pizzazz; Versamark
Miscellaneous:  Simply Scored Scoring Tool; Stampin' Dimensionals; Gold Embossing Powder; Heat Tool; Stampin' Sponges; Paper Piercer with Mat; Gold Brads; 1/2" Circle Punch; Paper Snips; Crystal Effects; 1-1/4" Square Punch; 1-3/8" Square Punch; Stamp-a-ma-jig
Special Instructions:  Each square was gilded with gold embossing powder around the edges.  When mounting the middle pieces of the sampler onto the 8 X 8 Vanilla piece, if you lined up the embossed lines on the squares with the first row of embossed lines on the 8 X 8 piece, the top lines would match up, too!  Really cool!

Monday, November 4, 2013

Magnificent Maple Card

Here's a fabulous card that was designed by - who?  If anyone knows, please let me know!  I'm really enjoying the Sweater Weather Designer Series Paper.  I think it's going to be one of my forever favorites!  All supplies used and shown are from Stampin' Up!  To order any of these products, you can visit my 24/7 online store at www.pennythomas.stampinup.net and click on "Shop Now."  The recipe is below:

Recipe:

Paper:  Whisper White - 11 X 4-1/4; Whisper White - 5-1/4 X 4; Whisper White scrap; Sweater Weather Designer Series Paper - 2-1/2 X 2-1/4 (2)
Stamps:  Banner Greetings; Magnificent Maple
Inks:  Early Espresso
Miscellaneous:  Stampin' Dimensionals; Big Shot Machine; Woodgrain Embossing Folder; 1-1/4" Burlap Ribbon - 5-1/4" long; Craft Scissors; Paper Snips; Mini Glue Dots; Stampin' Sponge; Naturals Designer Buttons; Early Espresso Baker's Twine - 8" long

Truly Grateful Card

Hello and happy fall to you!  This is a beautiful card that Jenny Peterson sent to me since I elected not to attend the Founder's Circle trip this year.  This was her swap for Founder's Circle and she was nice enough to mail one to me.  I think it is lovely and I adore it because it's a "Jenny Peterson" card.  All supplies used and shown are from Stampin' Up!.  To order these products, you can visit my 24/7 online store at www.pennythomas.stampinup.net and click on "Shop Now."

Recipe:

Paper:  Soft Suede - 8-1/2 X 5-1/2; Very Vanilla - 3-1/4 X 2-1/4; Soft Suede scrap; Very Vanilla scrap
Stamps:  Truly Grateful; Tags 4 You
Inks:  Crushed Curry; Cajun Craze; Early Espresso
Miscellaneous:  1-1/4" Burlap Ribbon - 4" long; Victoria Lace Trim - 2" long; 1/8th-inch Hole Punch; Itty Bitty Shapes Punch Pack; Linen Thread - 10" long; Stampin' Sponge; Stampin' Dimensionals; Craft Scissors; Basic Pearl Jewels; Paper Snips; SNAIL Adhesive

Fall Muslin Bag

I love this!  It just needs to have some caramels inside, don't you think?  I found this idea on Pinterest, but the picture didn't give anyone credit, so I'm not sure who we should offer applause to, but it isn't my design.  All supplies used and shown are from Stampin' Up!  To order any of these products, you can visit my 24/7 online store at www.pennythomas.stampinup.net and click on "Shop Now."

Recipe:

Paper:  Sweater Weather Designer Series Paper (the large leaf) - 3-1/2 X 3-1/2; Tangerine Tango (the small leaf) - 2-1/2 X 2; Very Vanilla scrap
Stamps:  Banner Greetings
Inks:  Early Espresso; Coastal Cabana
Miscellaneous:  Muslin Bags; Autumn Accents Die; Big Shot Machine; Stampin' Sponge; Paper Snips; Square Lattice Embossing Folder; Naturals Designer Button; Linen Thread - 10" long; Mini Glue Dots; Sponge Dauber; Sticky Strip; Build A Banner Simply Created Kit

Wonderfall Card

Here's a lovely fall card for you!  It was designed by Marcee Rodgers.  I modified it slightly by changing the greeting and adding a button, but she deserves the credit for the original design.  All supplies used and shown are from Stampin' Up!  To order these fun products, you can visit my 24/7 online store at www.pennythomas.stampinup.net and click on "Shop Now."  The recipe is below.

Recipe:

Paper:  Crumb Cake - 8-1/2 X 5-1/2; Sweater Weather Designer Series Paper - 5-1/2 X 1-1/2; Crumb Cake - 3-1/2 X 3-1/2; Crumb Cake - 2-1/2 X 2
Stamps:  Wonderfall; Truly Grateful
Inks:  Early Espresso; Cajun Craze; Crumb Cake
Miscellaneous:  Stampin' Sponge; SNAIL Adhesive; Stamp-a-ma-jig; Autumn Accents Die; Big Shot Machine; Stampin' Dimensionals; Linen Thread; Craft Scissors; Naturals Designer Button; Mini Glue Dots; Neutrals Candy Dot

Harvest of Thanks Card

This beautiful card was designed by Dani Dziama.  It's a fun card to make because you take the Very Vintage Designer Button and push it into the Versamark pad to get it sticky with ink.  Then you just sprinkle Pool Party Embossing Powder over it, pick it up with tweezers by the holes in the center, and heat it with a heat tool.  It adds a nice touch to the card - and how fun that you can color-coordinate these buttons to any project you're making.  All supplies used and shown are from Stampin' Up!  To order these great products, you can visit my 24/7 online store at www.pennythomas.stampinup.net and click on "Shop Now."  The recipe is below.

Recipe:

Paper:  Soft Sky - 11 X 4-1/4; Very Vanilla - 2-1/2 X 1-1/4; Sweater Weather Designer Series Paper (the blue plaid) - 3-1/4 X 1; Sweater Weather Designer Series Paper - (the Crushed Curry pattern) - 2-3/4 X 1/2"; Paper Doily
Stamps:  Harvest of Thanks
Inks:  Chocolate Chip; Versamark
Miscellaneous:  Paper Snips; SNAIL Adhesive; Very Vintage Designer Button; Pool Party Embossing Powder; Heat Tool; Linen Thread - 10" long; Craft Scissors; Mini Glue Dots; Bitty Banners Framelits

Harvest of Thanks Place Card


I don't have fancy Thanksgivings at my house - it's very casual, sitting around the dining room table in our jeans!  It's usually hot here in Texas at Thanksgiving, so sometimes we even have shorts and flip-flops on, but I still would like to make these place cards for our table.  It will make our casual table seem more dressed up with beautiful place cards.  Okay, maybe I'll even pull out a nice tablecloth and make a pretty centerpiece, too!  It will be really special........hopefully!  Connie Collins designed this place card using the Circle Card Thinlits.  By just folding one of the creases back, it makes a perfect place card.  To order these fine products, you can visit my 24/7 online store at www.pennythomas.stampinup.net and click on "Shop Now."  All supplies used and shown are from Stampin' Up!  The recipe is below.

Recipe:

Paper:  Chocolate Chip - 6 X 5-1/2; Sweater Weather Designer Series Paper (the coral pattern) - 5-1/2 X 3/4"; Sweater Weather Designer Series Paper (the plaid pattern) - 5-1/2 X 1/2"; Sweater Weather Designer Series Paper (the Crushed Curry circle) - 2-3/4 X 2-3/4; Whisper White scrap; Sweater Weather Designer Series Paper scrap
Stamps:  Harvest of Thanks; Designer Type Photopolymer Stamps; Woodgrain
Inks:  Early Espresso; Calypso Coral; Crushed Curry
Miscellaneous:  Circle Card Thinlits; SNAIL Adhesive; Linen Thread - 23" long; Craft Scissors; Circles Collection Framelits; Stampin' Sponge; Stampin' Dimensionals; Deco Labels Framelits; Big Shot Machine; 1-3/8" Circle Punch; 1-1/4" Circle Punch; Bitty Banners Framelits; Linen Thread - 10" long; Calypso Coral Button; Mini Glue Dots; Modern Label Punch

3D Apple

An apple a day keeps the doctor away, but it's even better medicine to make your own apple!  I found a 3D apple tutorial on Splitcoaststampers and knew it would be perfect for fall.  Super-easy to make!  You need 25 heart punch-outs.  Fold each heart in half.  Then, holding about ten hearts in your hand, cut off the bottoms so the apple will be able to stand on its own.  Sponge red ink on the bottoms, green ink on the tops, and then glue the sides of each heart together near the spine.  There's your apple!  All supplies used and shown are from Stampin' Up!  To order these fun products, you can visit my 24/7 online store at www.pennythomas.stampinup.net and click on "Shop Now."  The recipe is below.

Recipe:

Paper:  Early Espresso scrap; First Edition Designer Series Paper (retired)
Stamps:  None
Inks:  Cherry Cobbler; Old Olive
Miscellaneous:  Stampin' Sponges; Full Heart Punch; Bird Builder Punch; Bone Folder; SNAIL Adhesive; Paper Snips