Friday, June 27, 2014

A Great Birthday!

Hello, blogging friends!  Yesterday was a wonderful day!  I turned 57 and had a great time celebrating my birthday with my family.  Some friends took me out to lunch at the beginning of the week.  My kids delivered breakfast to me from Black Walnut Cafe, which was very nice!  For lunch, we ordered pizza and watched the U.S. vs. Germany soccer game together.  My daughter and I went shopping in the afternoon - and then the whole family went to BJ's for dinner.  Haley made a chocolate cake for me, which is my absolute favorite!  My dear husband gave me a very nice gift certificate to Papertrey (and so did my sister!), so I've been having fun selecting what I want!  It was a lovely day!  When you celebrate a birthday in my family, the kitchen table is always decorated to greet you first thing in the morning.

While my kids make wonderful hand-made cards for me, I also received some very nice hand-made cards in the mail, too!  Here are a few of them:
Isn't the card above adorable?  It was made by my sister!
The card above was made by my good friend Michele Smith!
The card above was made by Carolyn Gray!  Love the color combo!
The card above was made by Judith Walker, who knows I adore vanilla on vanilla!
This flip card was made by Mary Ellen Cope!  Isn't it cute?
The card above was made by my friend Marilu Rakintzis.  Love slider cards!
The adorable card above was made by Benedicte Richard!  LOVE IT!
The cute card above was made by Victoria Allen.  Doesn't the cake look shabby chic?  I think it's adorable!

Thanks for all the great cards!  It made my birthday feel really special!  And now I'm off to move furniture into my mom's new apartment at The Solana!  She'll be moving here tomorrow!  YAY!

Monday, June 23, 2014

Beth's Stamp Camp!

Happy Monday!  On Saturday, I attended my friend Beth's stamp camp.  I must admit it felt rather odd to be attending a stamp camp rather than hosting one.  For 15 years, I held a stamp camp in my home every month - sometimes twice a month - but it was really nice to be on the customer side for once!  I had a fun day making beautiful cards.  I appreciate all the time and effort that goes into putting a stamp camp together because I know exactly how much is involved.  A BIG shout-out to Beth for a superb and well-orchestrated stamp camp!  It was fun to see some of my old customers there and to spend the day stamping with them.  I complimented Beth on the fresh approach she has with Stampin' Up!  She made me want things!  Just when I thought there wouldn't be a single thing I would be interested in purchasing, she used a stamp set that I just had to have.  And, of course, I ended up placing a $90 order, so I know Beth is going to do just fine!  She's a GREAT salesman if she can entice me to purchase another stamp set, given how many I already have (see my post from last week)!  What the heck - now I have 2,501 stamp sets!  If you live in the Katy/Houston area and are interested in attending any of Beth's stamp camps, contact me, and I'll share her information with you.  Not only is she a terrific demonstrator, but she's a very good friend, too!  I know you'd be happy with her!  Here are the cards we made at her stamp camp:

Aren't these great cards?  Have a wonderful day, everyone!  I'm having lunch with a couple of friends today to celebrate my birthday this week!  Then I'll get back to working on organizing all of my stamp sets.  I made great progress over the weekend and can see the light at the end of the tunnel! 

Friday, June 20, 2014

Organizing My Craft Stuff!

Hello!  I've been BUSY lately!  Since retiring from Stampin' Up! a couple of weeks ago, I'd like to organize all of my crafting supplies so I know exactly what I have available to craft with.  I have OODLES and OODLES of "stuff" to go through.  The first thing I want to tackle is organizing and cataloging all of my stamp sets.  You might think that would be a relatively easy task, but..........I hope you're sitting down.........I have approximately 2,500 stamp sets!  THERE, I ADMITTED IT!  I hoard stamps - or maybe I should say I'm a stamp collector!  Collecting stamps over a 15-year period has given me quite a collection.  All of the binders in the picture below contain the image sheets of all of my stamp sets.  Each binder holds about 80 sheets.  So far, I have 20 full binders, and I'm not finished yet!  I have spent the last three days categorizing my stamp sets into different topics, so now I will be able to easily find things.  If I want to stamp a wedding card, no problem!  I'll just go to the binder with the "wedding" section and I'll be able to see my complete selection of wedding stamps, whether they're retired or not.  Some of my stamp sets date back to 1997!  And you know what?  They're still awesome!  Once I have a grip on exactly what I have, I will want to sell some of them.  It's difficult to house that many stamp sets and I really want to downsize, but it will take lots of time to go through each stamp set and decide whether I want to keep it, sell it, or give it away.  After I've tackled my stamp sets, then I'll move on to papers and punches and embellishments and ribbons and.........well, the list goes on and on.  I'm excited, though.  Although it's a HUGE job, it feels good to go through all of it and get it all in shape.  I haven't been stamping over the last couple of days, but I'll get back to it soon.  One can never go too long without stamping - and I've got some stamping projects to work on!

GOOD NEWS:  We received word yesterday that The Solana (the retirement center I've been donating cards to) now has a large one-bedroom apartment available for my mom.  YIPPEE!  We've been waiting and waiting and waiting - and the time has arrived!  She will move over quickly - probably within the next two weeks!  I'll be very happy to have her close by - she currently lives in Uvalde, Texas.  Many of you may not know that my father passed away on April 27th, just two days before I was to leave on the Stampin' Up! cruise.  I had to cancel my trip.  :(   My dad had Stage 4 kidney disease (and a hundred other things, too), so while it breaks my heart for him to have died, I am happy that he is finally free of his wheelchair, the nursing home, all of his medications, his bleepity-bleep catheter (which drove him absolutely crazy - and all of us, too), and all of the pain!  LOVE YOU, DADDY!  Every time I see a cardinal, I think of you.  There was a beautiful cardinal on your bird feeder the other day and it made me feel that you had come for a visit.  Somehow I get comfort in that.


 When I get all of this done, it will be AWESOME, and I'll be one happy (and organized) gal!

Wednesday, June 18, 2014

"Zoo Babies" Card

Continuing on with my baby card frenzy, here's another card that I made for my OB/GYN.  He'd be crazy not to want these!  In fact, I'm going to save one of these myself - and when the time is right that my son or my daughter have a baby in their future, I'd like to use this for their baby announcement.  There's nothing like being prepared, right?  Of course there's always the possibility that they'd have other plans for their baby announcements, but I'll twist their arms until they agree to this one.  What could be cuter than this to announce the arrival of your new little one?  This card was designed by Veronica Falis - I think it is adorable - and I couldn't wait to pull out my "Zoo Babies" to give it a try.  Love how it turned out!


All supplies are from Stampin' Up!  Here's what I used:

Paper:  Whisper White
Stamps:  Zoo Babies; Itty Bitty Banners; Perfect Pennants
Inks:  Basic Black; Daffodil Delight; Smoky Slate; Pink Pirouette; Bashful Blue
Miscellaneous:  Stampin' Dimensionals; Pretty in Pink Satin Ribbon; Bashful Blue Satin Ribbon; Bitty Banners Framelits; Big Shot; Stamp-a-ma-jig; Delicate Designs Embossing Folder

Tuesday, June 17, 2014

"Baby, We've Grown" Cards

Over the past weekend, I got into a real baby card frenzy.  It's probably because we are going to see my daughter's OB/GYN tomorrow and I want to take some cards to him to give to his patients who have delivered babies.  I'm not sure how they will feel about sending baby cards to their new moms, but I think it's a very special thing to do, and who wouldn't enjoy receiving a hand-stamped card in the mail, especially when it's so cute?  I got this card idea from Ilina Crouse, although I changed it up a bit by adding embossing and cutting the baby shoes out and popping them up.  I really like how they turned out, especially the "cute boy" cards!  I'll let you know if the doctor's office likes the idea or not.  I may come home with a bunch of baby cards.  Know anyone having a baby?


All of the supplies are from Stampin' Up!  Here's what I used: 

Paper:  Very Vanilla 
Stamps:  Baby, We've Grown 
Inks:  Pink Pirouette; Bashful Blue 
Miscellaneous:  Stampin' Dimensionals; Pretty in Pink Satin Ribbon; Bashful Blue Satin Ribbon; Perfect Polka Dots Embossing Folder; Square Lattice Embossing Folder; Deco Labels Framelits; Big Shot

Check back tomorrow for another baby card that is to die for!  I giggled while I was making them!

Update:  WOO HOO!  Our OB/GYN was so appreciative of the baby cards I made!  He asked me how much they were and I told him I was giving them to him and to just enjoy them.  He agreed that it would be really nice if he and his staff signed the card and sent it to a new mom!  When he runs out, I would love it if he hired me to make more.  I'll keep my fingers crossed!

Monday, June 16, 2014

"Wetlands" Card

Hello, Stamping Friends!  Last Friday I met with some of my stampin' buddies and we stamped for the entire day!  Everyone cranked out a lot of cards.......except me!  I had so much that I wanted to get done, but I started with this "Wetlands" card that I saw on Pinterest - the original designer is Jen Nelson - but for some reason, I just wasn't happy with it!  It looked beautiful on Pinterest, but when I stamped it in real life, it just felt.....well......like it was lacking something.  I spent the entire day messing with it.  My stampin' buddies offered their suggestions, and I tried all of those, but kept coming back to just the simpleness of this card.  After looking at it for several days, I've decided that I like it just the way it is.......just plain like this.....I guess!  Hmmm....has that ever happened to you?  Still not sure if I'm completely happy with it, but I'm going with it!  I'm going to take quite a few of these cards to The Solana, a retirement community near my house, to use for their male residents.  I hope they like it!

Here's the recipe.  All supplies are from Stampin' Up!:

Paper:  Pool Party
Stamps:  Wetlands; Something to Say
Inks:  Soft Suede Marker; Smoky Slate Marker; Smoky Slate 
Miscellaneous:  Stampin' Dimensionals; Stamp-a-ma-jig

Check back tomorrow for some super-cute baby cards!

Thursday, June 12, 2014

Popsicle Cards!

My daughter just recently had a tonsillectomy at the age of 19 - OUCH!  It's been WAY worse than we ever imagined.  When people hear you're having a tonsillectomy, they say, "Oh, you get to eat lots of Popsicles and ice cream," which makes it all sound kind of fun, but let me assure you, there is NOTHING fun about it.  Since I've been on a real card-making binge lately - a period of uncontrolled self-indulgence with stamping - I thought I'd make some Popsicle cards to give to Haley's doctor to send to her patients after they've had a tonsillectomy.  Since there's a two-week recovery period, there is plenty of time to drop a card in the mail to her patients to let them know she's thinking of them.  How often have you gotten a card from your doctor after surgery?  NEVER!  I think it would be such a nice personal touch for a doctor to do that - especially to send a hand-stamped card.  I'm hoping she'll like this idea and will want more in the future.  Who knows, maybe she'd even ask me to make cards for all of her patients after surgery.  I've got some cute Band-Aid stamps I could use!  First, I made some cards for my own personal stash that say "Enjoy Summer."  Love these Popsicles. 


Aren't they cute?  Of course I had to add a rhinestone for some bling!  This card is appropriate for females, so I'll have to make some Popsicle cards for boys.  I guess boys have their tonsils removed, too, don't they?

I thought "Happy Healing" was perfect for tonsillectomy Popsicle cards.  After all, you're not sick - you're healing!  I used a mix of Papertrey supplies (PTI) and Stampin' Up! (SU) supplies for these cards.  Here's what I used:

Paper:  Whisper White (SU)
Stamps:  And Many More (SU); Summer Sweetness (PTI)
Inks:  Basic Black (SU); Melon Mambo (SU); Pumpkin Pie (SU); Lucky Limeade (SU); Rich Razzleberry (SU)
Miscellaneous:  Perfect Polka Dots Embossing Folder (SU); Big Shot (SU); Stampin' Dimensionals (SU); Stamp-a-ma-jig (SU); Rhinestone Jewel (SU); Black and White Baker's Twine (SU); Popsicle Die (PTI)

Update:  We met with Haley's doctor and gave her the "Happy Healing" cards.  She absolutely loved them!  She has just finished 15 years of study of the head and neck and will be traveling to Prague to hold a party for her family and friends to celebrate finishing her medical studies.  She'd like to give a card to her guests that will contain her picture, along with information about her schooling and her achievements, as well as some room to write a personal note to each guest, on the inside.  She asked if I would be willing to design the front of that card and make them for her.  Really?  I'd be honored to do that - Haley and I just love her - and I'm looking for a rubber stamp of a doctor's bag and a stethoscope.  Not to worry, I found a beautiful vintage one - and now I'm busy!  She wants 40!  Just wish she could take me to Prague with her.  The party will be in a castle!  AWESOME!

Wednesday, June 11, 2014

"Circle Scribbles" Notepad

I recently learned how to make this adorable little notepad and kind of went bonkers with it!  It's right up my alley!  I love little things like this that I can make with my own hands!  The notepad contains 24 pages that I stamped with scribbles at the bottom, leaving room for notes at the top.  The pages of the notepad tear out easily - LOVE IT!  I made one to keep, of course, and I made one for my son's girlfriend Izzy, but I want to make a million more.  Izzy loved it, so I plan to make these for lots of fun little gifts.  I think Christmas notepads would be adorable - an awesome stocking stuffer - (and what about Halloween?) - so you'll probably see more notepads in the future!  Ha!  I entered a notepad design contest with my little notepad - the winner will be randomly selected.  I'll let you know if I win or not!  Here's the link for the instructions.  HAVE FUN!  Update:  Darn - didn't win!  I could have used that $25 gift certificate for more stamps!


I used a mix of Papertrey (PTI) supplies and Stampin' Up! (SU) supplies for this notepad - and here's what I used:

Paper:  Very Vanilla (SU); Fine Linen Pattern Pack (PTI); Vanilla Coaster Board (SU)
Stamps:  Circle Scribbles (PTI); Phrase Play #4 (PTI)
Inks:  Early Espresso (SU); Tangerine Tango (SU); Melon Mambo (SU)
Miscellaneous:  Sticky Strip (SU); Fine Linen Satin Ribbon (PTI)

Check back soon for more stamping fun!

Tuesday, June 10, 2014

Library Card Thank You Card

I'm having fun using some different supplies lately!  I'm totally hooked on Papertrey and their fresh images and the quality of their papers.  I have a good friend who recently treated me to a Mexican food lunch, complete with a Margarita (oh, yeah!), so I came home and made her a thank-you card, along with a matching envelope, using some of my new supplies.


This card uses a mix of Papertrey (PTI) supplies and Stampin' Up! (SU) supplies.  Here's what I used:

Paper:  Very Vanilla (SU); Fine Linen Pattern Pack (PTI)
Stamps:  Library Card (PTI); Warm Hospitality (PTI); Petite Petals (SU)
Inks:  Marina Mist (SU); Early Espresso (SU)
Miscellaneous:  Stampin' Dimensionals (SU); Petite Petals Punch (SU); Vintage Faceted Button (SU); Rhinestone Jewels (SU); Scallop Edge Border Punch (SU); Marina Mist Satin Ribbon

Check back tomorrow for a super-cute notepad I made!

Monday, June 9, 2014

"Pomp & Circumstance" Graduation Card

One of my nieces graduated last Saturday from Douglas MacArthur High School in San Antonio.  I was excited that I had time to make a card for her.  WOW!  It's got a lot of pop, don't you think?  I like it and I'll have to make another one for a second niece who is graduating from Boston College.  This card was designed by Diana Eichfeld.  I think a birthday greeting would work nicely, too.

All of the supplies for this card are from Stampin' Up! - and here's what I used:

Paper:  Crumb Cake; Pacific Point; Hello Honey; Whisper White; Silver Glimmer Paper
Stamps:  Chevron Background; Simply Stars; Pomp & Circumstance
Inks:  Pacific Point; Hello Honey; Pacific Point Marker; Crumb Cake Marker
Miscellaneous:  Chevron Embossing Folder; Big Shot; Natural 5/8" Chevron Ribbon; Stampin' Dimensionals; Decorative Label Punch; Stampin' Sponge; Star Punches (retired from Stampin' Up!); Rhinestone Jewel

Check back soon for more stamping fun!

Sunday, June 8, 2014

"Create a Cupcake" Birthday Card

Oh, this birthday card is so cute!  It was originally designed by Limedoodle, I believe.  I might be wrong about that, but I can't find the original picture that I took of it that shows the watermark.  I made quite a few of these for the retirement center.  It's a card you'd only want to give to a female (or at least I think so!), so I'll need to make some masculine birthday cards for them soon.  So simple, so cute, so what I like to stamp!

All of these supplies are from Stampin' Up! - and here's what I used:

Paper:  Whisper White
Stamps:  Create a Cupcake
Inks:  Pink Pirouette; Melon Mambo, Pumpkin Pie
Miscellaneous:  Stampin' Dimensionals; Needlepoint Border Embossing Folder; Big Shot; 2-3/8" Scallop Circle Punch; Cupcake Builder Punch; Calypso Coral Baker's Twine; Owl Builder Punch; Mini Glue Dots; Rhinestone Jewels

Check back soon for more stamping fun!

Saturday, June 7, 2014

I've Retired from Stampin' Up!, but I'm Still Stamping!

Hello!  I wanted to post this news because it's a BIG change in my life!  Yesterday, June 6th, I officially retired from Stampin' Up!  That is BIG news because for the past 15 years, I've been a demonstrator for Stampin' Up! and loved every single minute of it!  My association with Stampin' Up! was nothing but wonderful and amazing!  I was fortunate enough to earn trips that took me to places in the world I never would have had the opportunity to see!  I also made LOTS of stamping friends from all across the United States, many of which I will remain in contact with.  I also learned how to rubber-stamp - a hobby that will bring me much peace, happiness, and creativity for the rest of my life - which brings me to my next point:  I intend to keep my blog going!  Many of my stamping friends have asked me to keep it going, so I'll be happy to share whatever I'm currently working on.  I'm feeling like a kid in a candy store, though.  Since I'm no longer a demonstrator for Stampin' Up!, I feel free to purchase other crafting supplies - and I've been doing that quite a bit lately (as if I really need more things - ha!).  Because of that, the cards and projects I'll share on my blog may now consist of supplies other than Stampin' Up!  Hope you don't mind - many of you have told me you don't - so that explains why you may see other supplies listed.  Alrighty then, let's move on!


I just made a bunch of these cards for a retirement community that is nearby.  I thought it would be nice for them to use for their residents or staff.  They were elated to receive them - and it made me feel really good to use my time and my supplies to do something nice for them!  We both win!  This card was designed by Susanne Netz.  I changed the greetings so there was a nice selection for the retirement community to use.  All of these supplies are from Stampin' Up!  The recipe is as follows:

Paper:  So Saffron, Whisper White
Stamps:  Petite Petals; Happy Day
Inks:  So Saffron, Basic Black
Miscellaneous:  Petite Petals Punch; Stampin' Dimensionals; Stamp-a-ma-jig; Pearl Jewels

Check back regularly for more cards and projects!  HAPPY STAMPING!

Sunday, May 18, 2014

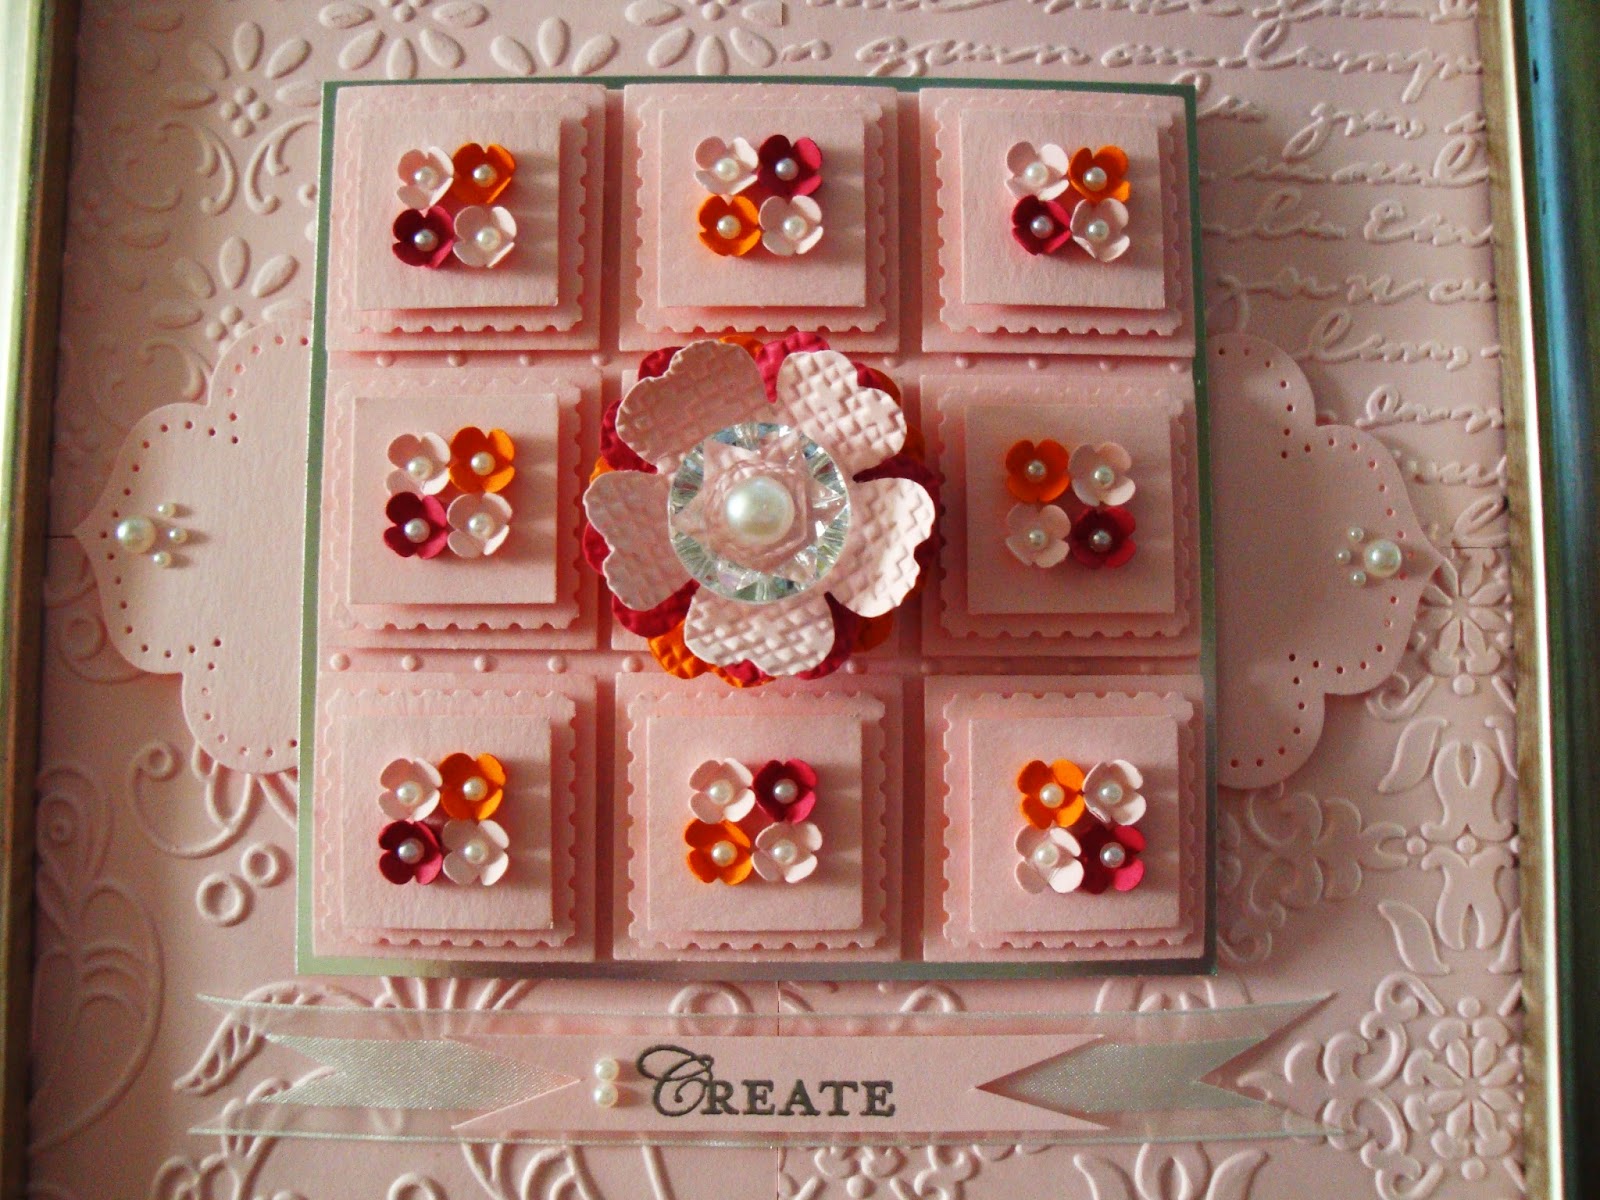
Spring Sampler


This past weekend we met and made another sampler to add to our series of samplers.  It's a spring sampler that was lots of fun to make!  Two of my favorite colors to use together are pink and orange.  This sampler was done in Pink Pirouette, but for splashes of spring color, I used Rose Red and Pumpkin Pie.  I provided everyone with four panels measuring 4 X 4.  They picked their favorite embossing folders to create a beautiful background.  Those four panels were then mounted onto an 8 X 8 base piece.  The punches used were the 1-3/8" Square Punch, the Postage Stamp Punch, and the 1" Square Punch, all of which were attached together with Stampin' Dimensionals for height and texture.  The little flowers were made using the Itty Bitty Shapes Punch Pack.  The big flowers in the center were made using the Pansy Punch.  We also used the Apothecary Accents Framelits and cut it in half so it would be extended from either side of the sampler.  A Vintage Faceted Button, a large pearl, Basic Pearl Jewels, and paper piercing were the perfect accents for this elegant sampler!  Hope you like it - I'm simply sampler crazy!  All supplies used and shown are from Stampin' Up!, with the exception of the platinum frame, which was purchased at a local craft store.

Wednesday, April 9, 2014

Backyard Basics Framelits Easter Card Samples

Aren't these sweet?  Pink Pirouette and Pistachio Pudding are perfect colors for Easter!  I used the Backyard Basics Framelits to cut out the Easter egg and put ribbons behind it to decorate a fancy egg!  I also used the Needlepoint Border Embossing Folder to get the cute cross-stitch design.


Here's another one where I substituted the ribbons for a piece of card stock embossed with the Chevron Embossing Folder.  Love them all - can't go wrong with the fabulous products from Stampin' Up!


Sunday, March 30, 2014

Birthday Sampler

Here is another offering in my sampler series!  We met over this past weekend to make this birthday sampler - and it was so much fun to make!  Whether you choose to use a white frame, a black frame, or a platinum frame - and whether you choose to use black and white chevron ribbon, white organdy ribbon, or the Delicate Details Lace Tape with a button embellishment, they all turn out cute!


All supplies used and shown are from Stampin' Up!  To order these great products, visit my 24/7 online store at www.pennythomas.stampinup.net.  The sampler recipe is as follows:

Recipe:

Paper:  Melon Mambo - 8 X 8; Silver Glimmer Paper - 6-1/2 X 6-1/2; Old Olive - 6-1/4 X 6-1/4; Crumb Cake - 6 X 6; Basic Black - 4-3/8 X 4-3/8; Whisper White scrap; Pumpkin Pie scrap; Melon Mambo scrap; Basic Black scrap; Silver Glimmer Paper scrap
Stamps:  Just Sayin'; Pennant Parade; A Dozen Thoughts; Birthday Cake; Sketched Birthday; Big Wish; Remembering Your Birthday
Inks:  Pumpkin Pie Marker; Old Olive Marker; Melon Mambo Marker; Basic Black; Melon Mambo; Pumpkin Pie; Old Olive; Basic Black Marker
Miscellaneous:  Stamp-a-ma-jig; Stampin' Dimensionals; Bitty Banners Framelits; Paper Snips; Basic Rhinestone Jewels; Big Shot Machine; 1-3/8" Square Punch; Silver Sparkle Dazzling Details; SNAIL Adhesive; Chevron Embossing Folder; 7/8" Scallop Circle Punch; Old Olive Simply Styled Embellishment (retired); Multipurpose Liquid Glue; Mini Glue Dots; Itty Bitty Punch Pack; Dazzling Diamonds Glitter; 2-Way Glue Pen; Sticky Strip; Tea Lace Paper Doilies; Delicate Details Lace Tape - 7" long; Tasteful Trim Die; Neutrals Button; Brights Button; 3/4" Chevron Ribbon - 20" long (or White Organdy Ribbon - 20" long); Owl Builder Punch; Pinking Hearts Border Punch (retired); Postage Stamp Punch; 1" Square Punch; Needlepoint Border Embossing Folder; Star Punch (retired)

Sunday, March 16, 2014

Petal Parade Card

It feels so good for it to almost be Easter!  We've had such a nasty winter - cold and wet - and I'm ready for spring!  This card embodies Easter and spring for me!  It looks so soft and elegant, so Easter......PLEASE get here quickly!  This is one of the items we made at my Friday Felicity.  LOVE IT!  Original Card Designer:  Joanne James

Recipe:

Paper:  Whisper White - 11 X 4-1/4; Pool Party - 5-1/4 X 4; Whisper White - 5 X 3-3/4; Whisper White - 3-1/2 X 2; Pool Party - 2-1/2 X 1/2; Whisper White scrap
Stamps:  Petal Parade; Happy Watercolor
Inks:  Pistachio Pudding; Pool Party; Summer Starfruit; Basic Black
Miscellaneous:  Stampin' Dimensionals; Decorative Dots Embossing Folder; Big Shot; Scallop Tag Topper Punch; Summer Starfruit Twine - 7" long; Mini Glue Dots; Corner Rounder; Paper Snips:  SNAIL Adhesive; Pearl Jewels; Stamp-a-ma-jig


Eggstra Spectacular Easter Card

Isn't this adorable?  I really love this card.  This is another item we made at my Friday Felicity.  Doilies, bunnies, buttons, and polka dot paper?  Can't go wrong with that!  To order these products, visit my website at www.pennythomas.stampinup.net.  Original Card Designer:  My precious friend Jenny Peterson

Recipe:

Paper:  Smoky Slate - 11 X 4-1/4; Smoky Slate - 4-3/8 X 3-1/8; Watercolor Wonder Designer Series Paper - 4-1/4 X 3; Watercolor Paper; Watercolor Wonder Designer Series Paper - 3-1/2 X 3/4" and 3 X 1/2" for the banners; Smoky Slate - 2-3/4 X 1/4" for the banner
Stamps:  Eggstra Spectacular
Ink:  Smoky Slate; Basic Black Marker; Daffodil Delight Marker
Miscellaneous:  Stampin' Sponge; Tea Lace Paper Doily; SNAIL Adhesive; Stampin' Dimensionals; 1-3/4" Circle Punch; Paper Snips; Basic Metal Button; White Baker's Twine - 7" long; Blender Pens

Blessed Easter Card

Here's another item we made at my Friday Felicity.  Although it took some time to make, everyone loved it and felt it was too nice to send to anyone!  Ha!  These are the kinds of cards you use for home decor.  Prop it up on an easel and you have a beautiful home decor piece for Easter!  To order these products, visit www.pennythomas.stampinup.net.  Original Card Designer:  Natasha Schwecke

Recipe:

Paper:  Very Vanilla - 11 X 4-1/4; Crumb Cake - 5-1/4 X 4; Watercolor Paper - 5 X 3-3/4; Blushing Bride - 2-1/2 X 2-1/4 (for the tiny butterfly)
Stamps:  Blessed Easter; Hello Doily; Gorgeous Grunge
Ink:  Black Stazon; Crumb Cake; Pistachio Pudding; Blushing Bride
Miscellaneous:  SNAIL Adhesive; Simply Scored Scoring Tool; Stamp-a-ma-jig; Blender Pens; Pearl Jewels; Paper Snips; Beautiful Wings Embosslits; Big Shot; 2-Way Glue Pen; Very Vanilla Seam Binding Ribbon - 16" long; Mini Glue Dots
Scallop Tag Topper Box

Greetings, my friends!  Last Friday I offered a Friday Felicity event where we made four Easter items.  It was a lovely day - I truly enjoy my stamping buddies so much!  If you would like to order any of these great products, I'd be thrilled for you to do so on my website @ www.pennythomas.stampinup.net.  This is what we made!


Recipe:

Paper:  Pool Party - 6-1/2 X 2 - scored at 2-3/4 and 3-3/4; Pool Party - 1-1/2 X 1-1/2 - scored at 1/4" inch on two opposite sides to form the sides of the box; Sweet Sorbet Designer Series Paper - 2-1/4 X 1-3/4 (for the eggs); Pistachio Pudding - 6 X 3/4" (for the grass); Crisp Cantaloupe scrap; Whisper White scrap
Stamps:  Springtime Hello
Ink:  Basic Black
Miscellaneous:  Scallop Tag Topper Punch; Polka Dot Embossing Folder; Big Shot; Simply Scored Scoring Tool; Sticky Strip; 2-Way Glue Pen; Fringe Scissors; Itty Bitty Shapes Punch Pack; Pearl Jewel; Paper Snips; Backyard Basics Framelits; SNAIL Adhesive; Mini Glue Dots; Crisp Cantaloupe Twine - 10" long; Linen Thread; Paper Piercer with Mat; Bitty Banners Framelits; Chocolate Nuggets (3)

Friday, February 28, 2014

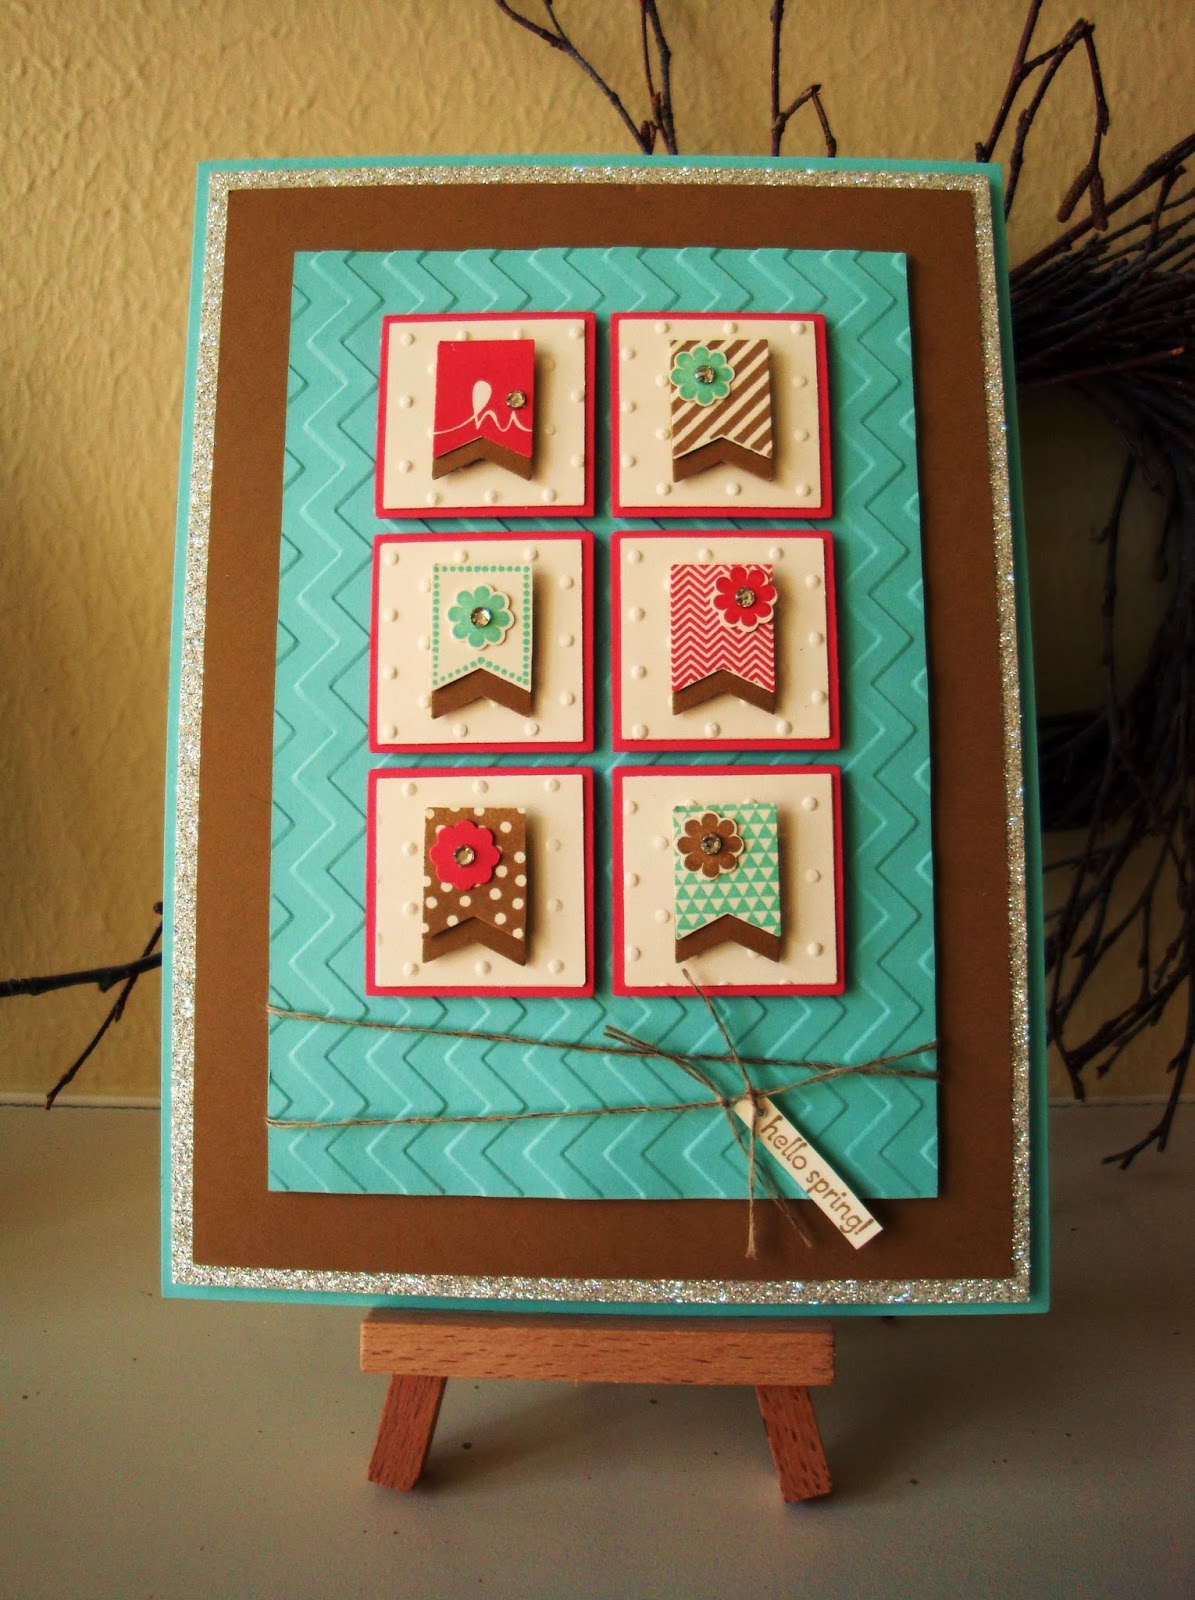
Tone on Tone Samplers

Hello to my blogger friends!  One of my recruits, Carolyn Gray, shared this cute sampler project with me.  I loved it so much, I made another one, adding a layer of our Silver Glimmer Paper and Pool Party card stock, embossed the white squares with polka dots, and popped up the banner pieces to give it a little more BLING!  I love how it turned out.


All of you know that I love tone-on-tone things, so I had to try my hand making this sampler in all Very Vanilla card stock.  I also tried making it in all Sahara Sand card stock with Pink Pirouette flowers.  They turned out beautifully!  I offered the Very Vanilla sampler, along with a Very Vanilla card, at my Thursday Therapy yesterday.  We had a wonderful time and everyone LOVED their samplers!  Thank you, Carolyn, for such a splendid idea!


Sampler Recipe:

Paper:  Very Vanilla - 7-1/2 X 5-1/2; 7-1/4 X 5-1/4; 7 X 5; 4 X 6 (you'll dry emboss on this layer); Very Vanilla scraps for the squares, the banners, the flowers, and the tag
Stamps:  Lovely Little Labels; Tiny Tags (sorry, this set is retired, but many CUTE current greetings will work for the tag)
Inks:  Basic Black or Early Espresso
Miscellaneous:  Stampin' Dimensionals; SNAIL Adhesive; Embossing Folder of your choice; Big Shot Machine; Linen Thread - 22" long; Jewelry Tag Punch (retired); Paper Piercer with Mat; 1-3/8" Square Punch; 1-1/4" Square Punch; Banner Punch; Itty Bitty Shapes Punch Pack; Mini Glue Dots; Pearls; Paper Snips; Perfect Polka Dots Embossing Folder

Card Recipe:

Paper:  Very Vanilla - 11 X 4-1/4; 4-3/4 X 3-1/2; 2-1/2 X 2-1/2 (for the Floral Fusion Sizzlits); 2-1/2 X 1/2"; Very Vanilla Scrap for the banners and the flowers
Stamps:  Teeny Tiny Wishes (a retired set, but many CUTE current greetings will work)
Inks:  Early Espresso or Basic Black
Miscellaneous:  Stampin' Dimensionals; Decorative Dots Embossing Folder; Big Shot Machine; Gold Baker's Twine - 22" long; Banner Punch; Itty Bitty Shapes Punch Pack; Mini Glue Dots; Pearls; Paper Snips; Floral Fusion Sizzlits; SNAIL Adhesive; Stamp-a-ma-jig