As you're viewing this, I'm in Salt Lake City at the Stampin' Up! Convention! Amazing what you can do with technology, right? I wish I could have fit you all in my back pocket and taken you with me! We have such a super fantabulous time - and then we come home totally obnoxious - all pumped up about Stampin' Up! and the products we sell! That's why we love to go - it reminds us how lucky we are to be part of such a wonderful company!
Okay, these colors make me melt! But what was I thinking? "To a Wonderful....Husband?" My husband doesn't want a card with a pink bow and flowers all over it! Why didn't I change that to "friend" or "sister"? Oh, well, this stamp set (the flowers, that is) is about to retire and I wanted you to see what a gorgeous card you can make with it before it's too late! All supplies used and shown are from Stampin' Up! - THE best rubber stamp company in the world!
Recipe:
Stamps: All Through the Year (P. 59); Wonderful Favorites (P. 145); Paisley Background (P. 136)
Paper: Certainly Celery - 8-1/2 X 5-1/2; Whisper White; 5-1/4 X 4; Regal Rose - 4-1/4 X 2-1/2; So Saffron - 5 X 2-1/4; Regal Rose - 4-1/2 X 1-3/4; Whisper White - 4-1/4 X 1-1/2; Certainly Celery Scrap for "husband"
Inks: So Saffron; Regal Rose; Certainly Celery; Basic Black
Miscellaneous: Regal Rose Wide Grosgrain (P. 191) - 16" long; Certainly Celery Brads (P. 189); Stampin' Dimensionals (P. 186); Paper Piercer with Mat (P. 189)
Wednesday, July 30, 2008
Monday, July 28, 2008
Card of the Week - July 28th
Here's another gorgeous birthday card I received - it's so soft and soothing - and this one came from my sister, Pam, who is a demonstrator in Missouri! I'm just sick that the Soft Sky Designer Paper is being discontinued, but I guess we have to make room for the cool new In Colors coming in. I love the Build-a-Brad in the center - it's one of my favorite accessories! All supplies used and shown are from Stampin' Up!
Recipe:
Stamps: Baroque Motifs (P. 120) - if you don't have this set, how come? It's a must-have!
Paper: Soft Sky (the card base) - 11 X 4-1/4; Whisper White - 4-1/4 X 4-1/2; Soft Sky - 4-1/4 X 2; Soft Sky Designer Paper - 2 strips that are 4-1/4 X 1; Whisper White scrap for the flower
Inks: Soft Sky
Miscellaneous: Soft Sky Double-Stitched Ribbon (P. 191); Scallop Punch (P. 181); Stampin' Dimensionals (P. 186); Pewter Build-A-Brad (P. 189)
Friday, July 25, 2008
Beautifully Simple Notecards
These two notecards embody everything that I love about stamping! My favorite cards are always the simple ones! They look so crisp and clean, and they're elegant and easy! I don't need all kinds of bells and whistles and doodahs on my cards to be happy, and I don't feel that I need to create a masterpiece to feel fulfilled! These cards make we warm and happy inside - and that's all I need! I made these with our prescored notecards. Any long sentiment will do, and any delicate flower will work, too! I challenge you to take out what you have and produce some instant cards like this! You'll build up a stash of thank-you notes, sympathy cards, birthday cards, or baby cards that you'll have ready when the occasion calls - and you'll be smiling from ear to ear! All supplies used and shown are from Stampin' Up!
Recipe: (And this recipe includes supplies for both cards)
Stamps: Artfully Asian (P. 56); All Holidays (P. 146); Live Your Dream (P. 9 from Occasions Mini Catalog)
Paper: Whisper White Notecards (P. 167) - and they come with the envelopes!
Inks: Basic Black; Bashful Blue Marker; Chocolate Chip Marker; Certainly Celery Marker; Pretty in Pink Marker
Miscellaneous: Bashful Blue Taffeta Ribbon (P. 191); Pretty in Pink Taffeta Ribbon (P. 191); scissors; Stamp-a-ma-jig (P. 184)
Wednesday, July 23, 2008
3 X 3 Box with Matching Cards Tutorial
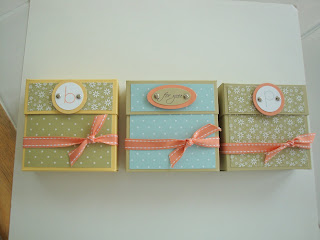
Here is the project we made at my 2008 Great eScape event with Stampin' Up! It was a huge hit! I would love to make 50 of these - and I practically did this last weekend with my first-level downline! They came to make these, too, and we had loads of fun! Give it a try, you'll be hooked! If you don't want to make your box and matching cards with monograms, you can use any of our stamps that can be punched out with a 1" circle punch, so the possibilities are endless and they all turn out so precious! The colors I used were Soft Sky, So Saffron, River Rock, and Groovy Guava. All supplies used and shown are from Stampin' Up! The videographer: My son, Hunter
Recipe:
Box Bottom: Card stock measuring 9 X 3-1/2; score along the 9" side at 1/2", 1-1/2", 4-3/4", and 5-3/4"; score along the 3-1/2" side at 1"; Designer Paper: 3 X 2-1/4; Ribbon: 14" long
Box Top: Card stock measuring 9-1/4 X 2-1/4; score along the 9-1/4" side at 1/2", 1-9/16", 4-7/8", and 5-15/16"; score along 2-1/4" side at 1-1/16"; Designer Paper: 3 X 1
Cards: Card stock measuring 5-1/2 X 3; score at 3"; white insert: 2-3/4" X 2-3/4"; Designer Paper: 2-1/2 X 3; Ribbon: 12" long
Miscellaneous: Sticky Strip; 1-1/4" Circle Punch; 1" Circle Punch; Paper Piercer with Mat; Silver Brads; Stampin' Dimensionals
Monday, July 21, 2008
Card of the Week - July 21st
Isn't this beautiful? This is another birthday card that I received, and it was stamped by my friend and fellow demonstrator, Trudy! I love how she used an oval to spotlight the flower and bee! I'm going to have to case this one for sure, but I was stupid and didn't purchase this stamp set while it was available! I hate it when that happens! All supplies used and shown are from Stampin' Up!
Recipe:
Stamps: Bloomin' Beautiful (retired now!); It's Your Birthday (P. 141); Weathered Background (P. 134)
Paper: Old Olive - 8-1/2 X 5-1/2; Certainly Celery - 4 X 2; Ruby Red - 3-3/4 X 1-3/4; Certainly Celery - 3-3/4 X 2-3/4; Whisper White - 3-1/2 X 2-1/2
Inks: Ruby Red; Old Olive; Basic Black; Apricot Appeal; Certainly Celery
Miscellaneous: Celery Grosgrain Ribbon; Crystal Effects (wings of the bee); Gold Brads; Coluzzle Cutter System (for the oval); Stampin' Sponge; Blender Pens
Friday, July 18, 2008
Double Gift-Card Holder Tutorial
Here's a fun project for you! It's so easy to make! This little project has two different pockets to hold two different gift cards! I think it would be fun to have a gift card to a restaurant in one pocket and a gift card to the theater in the other pocket to treat a friend to dinner and a movie! Fun, huh? Or how about one gift card to Talbots and the other gift card to Cold Water Creek to treat a friend to a shopping trip? Or how about one gift card to a nail salon and the other gift card to a hairdresser for a day of pampering? The video tutorial below will show you how to make this double gift-card holder! All supplies used and shown are from Stampin' Up! The videographer: My husband Randy
Recipe:
Stamp Set: Sealed with a Kiss (P. 28)
Paper: Old Olive Designer Paper (P. 171) 7-1/2 X 5-1/2 - scored on the 7-1/2" side at 2" from each end; Bashful Blue - 3-1/2 X 3/4"; Whisper White scrap for square
Inks: Basic Black; Pretty in Pink Marker; Old Olive Marker; Bashful Blue Marker; So Saffron Marker
Miscellaneous: Sticky Strip (P. 186); Pink Grosgrain Ribbon - 10" long (P. 191); Soft Subtles Brads (P. 189); Stampin' Dimensionals (P. 186); Paper Piercer with Mat (P. 189)
Wednesday, July 16, 2008
Christmas Planner Tutorial
Well, I'm on a roll here with the "Christmas in July" theme, so why not continue? This is a Christmas Planner we made last November - and it was a huge hit! Would you ever actually use it? Maybe not - probably not - 'cause we'd rather keep it and just look at it every day! You can find these white file folders at Office Max, and you simply fold the outer covers to the center to create a nice accordion affect that has little pockets at the bottom. Little pockets are perfect for tucking fun little things into - that's what we love! Although the "Wintergreen" Christmas Designer Paper isn't available any longer - that's the beauty of stamping - you just adapt this to whatever you have, and it still turns out cute! We used the "Punch Pals" stamp set (P. 34) to create this planner, and in the video tutorial below, I'll show you how I made the snowy window that the adorable snowman is peeking into! As far as the "Wish List" and the "Card List," I just created lines on my computer and printed them up and then cut them down to fit in the pocket. The "Receipts" envelope is one of our "Small Open End Envelopes" (P. 167) to hold all of your coupons and receipts! The notepad is 4 X 6. This planner was embellished throughout using many of our punches - so put those on your "must have" list! They make decorating ANYTHING so much faster and easier! All supplies used and shown are from Stampin' Up!, unless otherwise noted. The videographer: My son Hunter
Monday, July 14, 2008
Card of the Week - July 14th
Wow! Doesn't this card just POP? My friend and fellow demonstrator, Carolyn, sent this to me for my birthday! I love how she used the Flower Fusion felt flowers to decorate it. It is such a classy card! This card would be considered a "large square" card - it's 6 X 6 in dimension. Don't forget, though, that you could slightly reduce the size to 10-1/2 x 5-1/4 to make a 5-1/4 X 5-1/4 card, which is considered a "medium square" card - and then it would fit into our 5-1/2 X 5-1/2 envelopes! The large circles were made with the Coluzzle Cutting System. All supplies used and shown are from Stampin' Up!
Recipe:
Stamp Sets: All Holidays (P. 146)
Paper: Old Olive - 12 X 6; Purely Pomegranate scrap; Old Olive scrap; Very Vanilla scrap
Inks: Purely Pomegranate
Miscellaneous: Flower Fusion (P. 177); Circle Rhinestone Brads (P. 189); Old Olive Wide Grosgrain Ribbon (P. 191); Coluzzle Cutting System (P. 184); Mini Glue Dots (to hold the flowers together)
Friday, July 11, 2008
Countdown to Christmas Calendar!
Last November, we got together and made these "Countdown to Christmas" calendars for early Christmas presents! We had a blast making them - it's a fun project! What you need is the 9 X 4-1/2 On Board Clipboard (P. 179); the Christmas designer paper you'd like to use; a Christmas image where the Santa is; a star punch; a "numbers" stamp set to stamp the numbers; brads; glitter; Stampin' Dimensionals; mini glue dots; an alphabet set to stamp the words; and ribbon! The number pockets are 2-1/4 X 1-1/2; scored at 1/2" to create little pockets to slide the numbers in and out of! The "number" pieces are 1-1/2 X 1. We decorated the back of the clipboard as well and placed a mini envelope back there to store the extra number pieces in while they're not being used! I purchased a stand to place my countdown calendar in, and it looks beautiful while displayed during the holidays! Each day, my kids and I would fuss over who would get to change the numbers! Fun, fun! It's not too early to start planning those special handmade gifts for Christmas! All supplies used and shown are from Stampin' Up!
Wednesday, July 9, 2008
Rolodex Birthday File
Don't you just love it when you can take ordinary office supplies and make them WAY more fun? If you're bored this summer and looking for a special project to keep you busy, you'll love this! Just take an ordinary Rolodex, make 12 tabs for the months, and then decorate the white Rolodex cards uniquely for each person's birthday that you'd like to remember! Since my son loves anything to do with "army," I just had to use the little tank on his card - and since my husband is an architect, I just had to use the "Architectural Elements" stamp set for his! Even our dog Otto has his own special page! The sky is the limit on a project like this! Your pages can be elaborate or very simple, whatever suits you! I used a nifty Rolodex tool to punch out the little grooves at the bottom of my card stock pieces so they would fit perfectly into the Rolodex! Gotta love it! Wouldn't it be fun to make a recipe Rolodex? For the tabs, you could stamp "appetizers," "main dishes," "desserts," etc., using the "From the Kitchen of" stamp set on Page 131 of the catalog! What an awesome Christmas gift! So many projects, so little time! All supplies used and shown are from Stampin' Up, unless otherwise noted!
Monday, July 7, 2008
Card of the Week - July 7th
How about some "Christmas in July" cards? Over the weekend, I found these cards that we made at last year's Christmas Card Workshop and it got me all excited about the upcoming Christmas Card Workshop I'll have in October! At my Christmas Card Workshop, you can make five of each card design, all the way up to ten of each card design, so that you have a good stash of cards on hand when the holiday season arrives! I've already established two of the card designs we'll use this year and I'm still looking for three more to complete the workshop! Once the new catalog and the Holiday Mini comes out, I know I'll find what I'm looking for! No recipes are attached - I just thought you would enjoy seeing them! Most of you came to the workshop and made these last year, so you have samples in your hot little hand! Unfortunately, the glitter doesn't show up in these photos, so you can't see how glittery and beautiful the cards are! All supplies used and shown are from Stampin' Up! - the best rubber stamp company in the world!
Thursday, July 3, 2008
Corner Bookmark Tutorial
I know you're going to love this! It's a quick, cute, easy, and fun project! I am attaching the recipe below for the bookmark I've demo'd in the tutorial! All supplies used and shown are from Stampin' Up! The videographer: My daughter Haley
Recipe:
Paper: Le Jardin Designer Paper - 4 X 4; Bordering Blue Card Stock; River Rock Card Stock; Very Vanilla Card Stock
Stamps: ABC Alphabet - Lower Case (P. 157)
Inks: Bordering Blue
Miscellaneous: Paper Scorer; Paper Snips; SNAIL Adhesive; 1-1/4" Circle Punch; 1" Circle Punch; 3/4" Circle Punch; River Rock Double-Stitched Grosgrain Ribbon
Subscribe to:
Posts (Atom)